TradingView is a brillant online trading platform. Its packed with features and simple to use. TradingView has been one of my favorite platforms for many years. One of the most popular features is paper trading using live market data.
This post will provide a simple step by step guide on how to use TradingView paper trading.
Signup for a Essential, Plus+ or Premium TradingView subscription using the link. *New users get $15 towards a new plan.
What is Paper Trading?
Paper trading is simply a trade simulation tool. This gives traders the opportunity to trade in a live market or using a replay of historical data using a simulated fund. Paper trading is normally recommended to beginner traders who want to get their feet wet in the market also experienced traders testing new strategies.
Paper Trading is a great way to practice trading in a riskless environment. Paper trading offers the opportunity to trade in a live market environment with real time price quotes and simulated order executions – similar to a live market environment.
Advantages and Disadvantages of Paper Trading
Paper trading, like many tools, shares a balance of advantages and disadvantages. Here’s an overview of the pros and cons:
| Pros |
- Test skills or a new system with zero risk
- Generally, a free feature for most platforms
- Gauge profitability of strategies with simulated profit and loss tracking
| Cons |
- Because emotions are taken out of the picture, paper trading fails to capture the whole trading experience. Trading psychological, one of the central pieces in successful trading, is not honed.
Paper Trading in TradingView
Tradingview paper trading feature is simple and easy to use. TradingView offers a free data feed for most markets – unlike many other platforms. TradingView supports stocks, forex, and cryptocurrencies – but not futures.
For futures paper trading, users need to have access to a futures data feed. This can be done by simply connecting a futures brokerage account to TradingView. If this interests you, refer to the guide I created on this topic.
How to Use Tradingview’s Paper Trading
In this section, we will take a deep dive in the step-by-step process of accessing paper trading in TradingView. After reading this comprehensive guide, you will learn all you need to know about the feature and confidently try it for yourself.
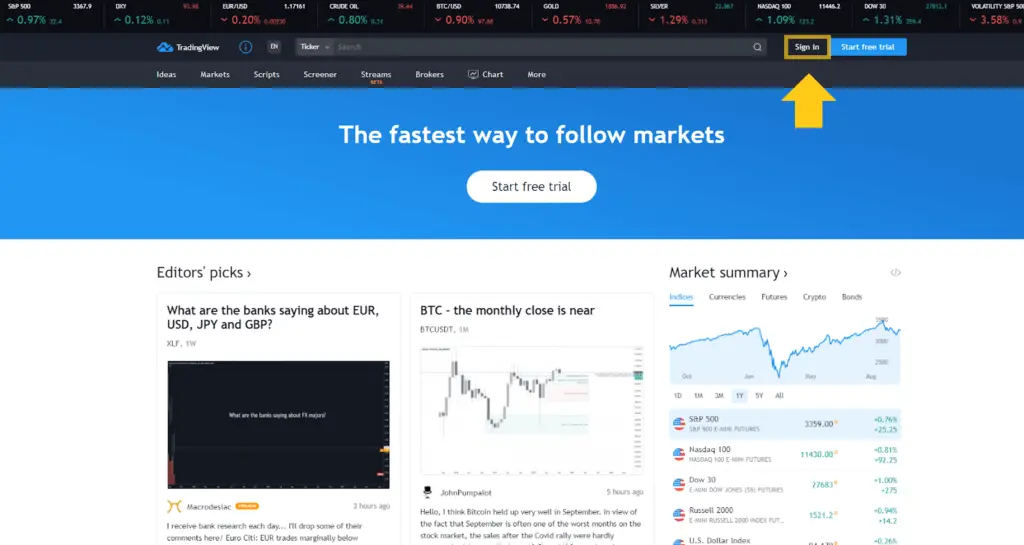
Step 1: Create/log in to your TradingView account
Before we get started. Make sure you are logged in to your tradingview account.
New Users
Signup for a Essential, Plus+ or Premium TradingView subscription using the link. *New users get $15 towards a new plan.
Existing Users
Log in to your TradingView account by clicking the Sign in button (yellow box & arrow) on the header of the homepage.
Signup for a Essential, Plus or Premium TradingView subscription using the link. *New users get $15 towards a new plan.
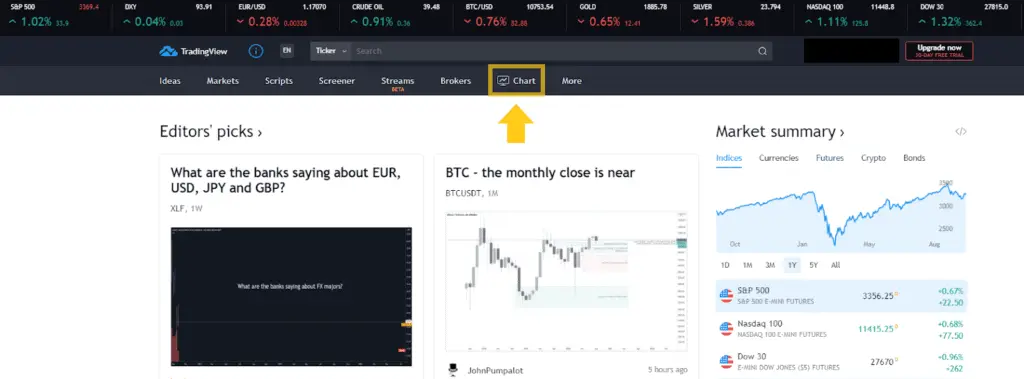
Step 2: Connect to Paper Trading
Where can I find the Paper Trading feature on TradingView?
Once logged in, click Chart on the header of your account homepage. See yellow box and arrow in the screencap below:
Connect to Paper Trading
The next step is to connect your account to the paper trading feature. This will give you access to the paper trading feature moving forward.
- Right click any area on your chart. This will show a dropdown menu.
- Hover on Trade (orange box)
- Click New Order (yellow box)
- Once clicked, a panel will appear below with a few options: Paper Trading and other brokerage options
- Select Paper Trading (black box)
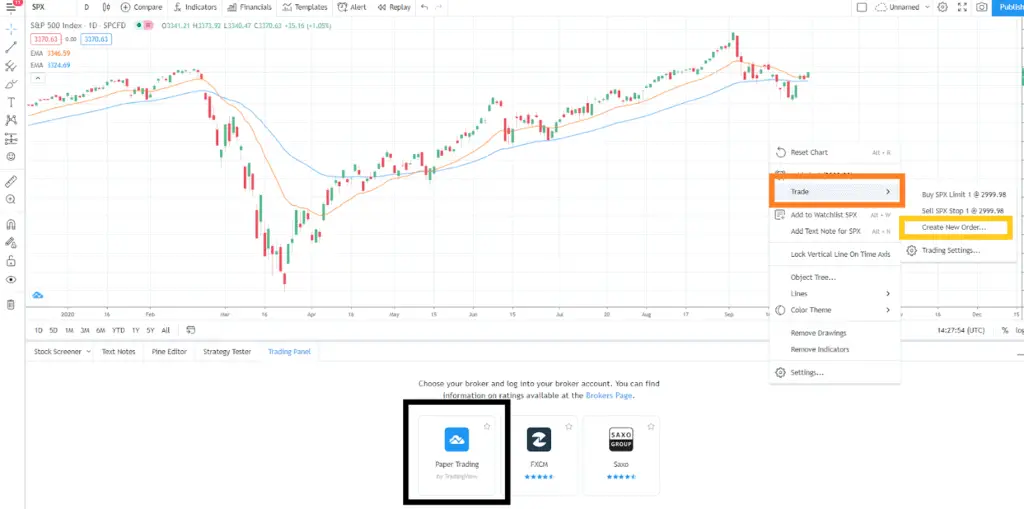
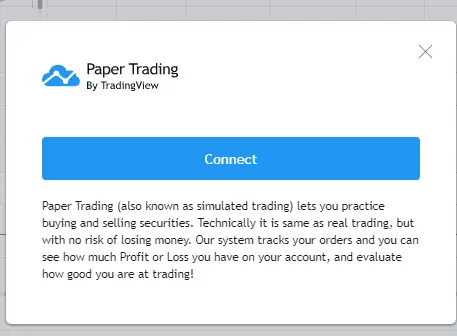
- Click Connect (see screenshot above)
- This will automatically load the Trading panel – by default, the starting capital of the demo account is set at $100,000USD* (see orange box above)

The green dot beside Paper Trading denotes that the feature is successfully active. See yellow arrow, black box above.
Step 3: Placing orders
There are several options to place a paper trade order. Here are some of the ways:
Buy and Sell Panel
This is one of the easiest way to initiate paper trades
- Step 1: Right click on any part of your chart
- Step 2: Click on Settings (yellow box, image below)
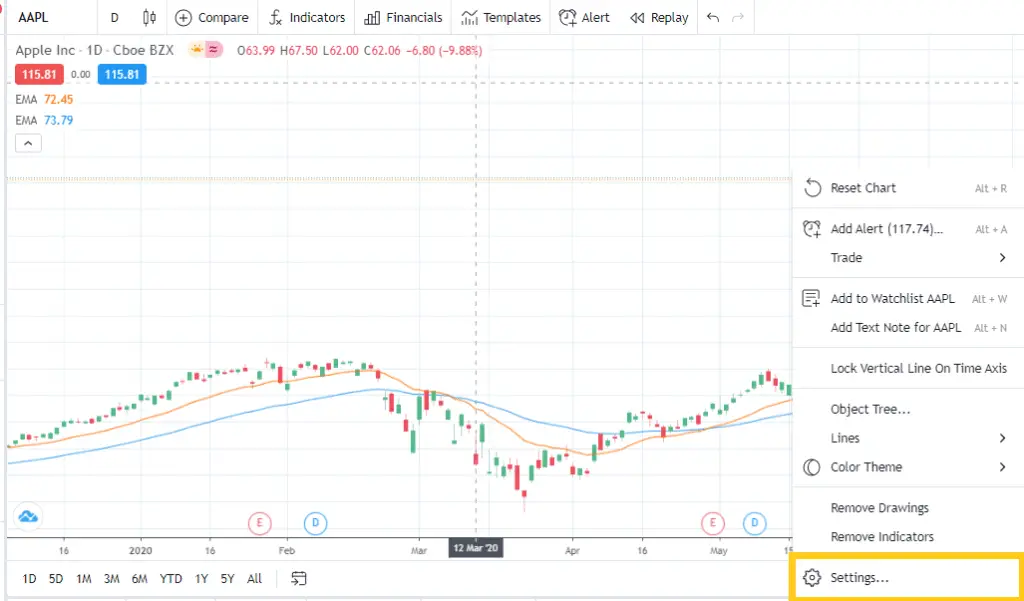
Upon clicking, the Settings panel will appear.
- Step 3: Select Status Line > Make sure that the Show Buy/Sell Buttons is ticked > Click OK
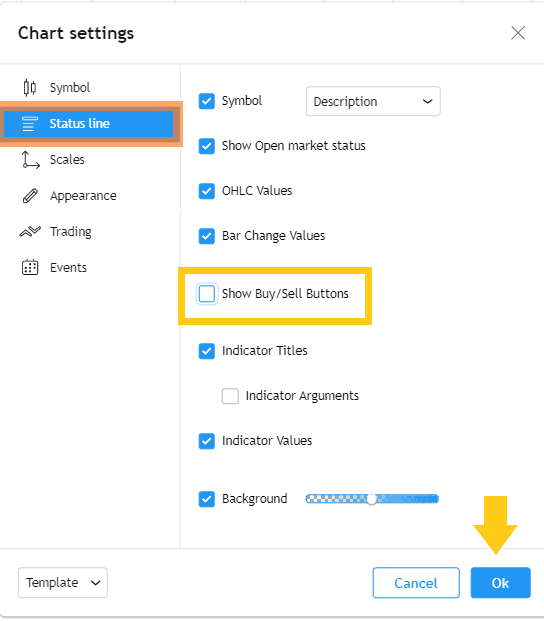
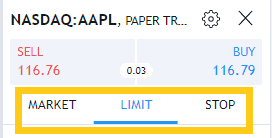
After ticking the ‘Show Buy/Sell Buttons’, the Buy (blue font) and Sell (red font) buttons will appear on the upper left-hand side of your chart.

Now that you have your buy/sell buttons setup, TradingView will save this as your preference and instantly show this panel once you open your charts.
To initiate your first trade, follow this next step:
- Step 4*: Simply select Buy Market (blue button) or Sell Market (red button)
Note: Buy/Sell buttons execute ‘Market Orders’. You may opt to buy/sell using the different types (at limit, or stop). We will discuss this more in the following section.
Upon clicking, the Order Panel (black box) will automatically appear on the right-hand side of the screen.
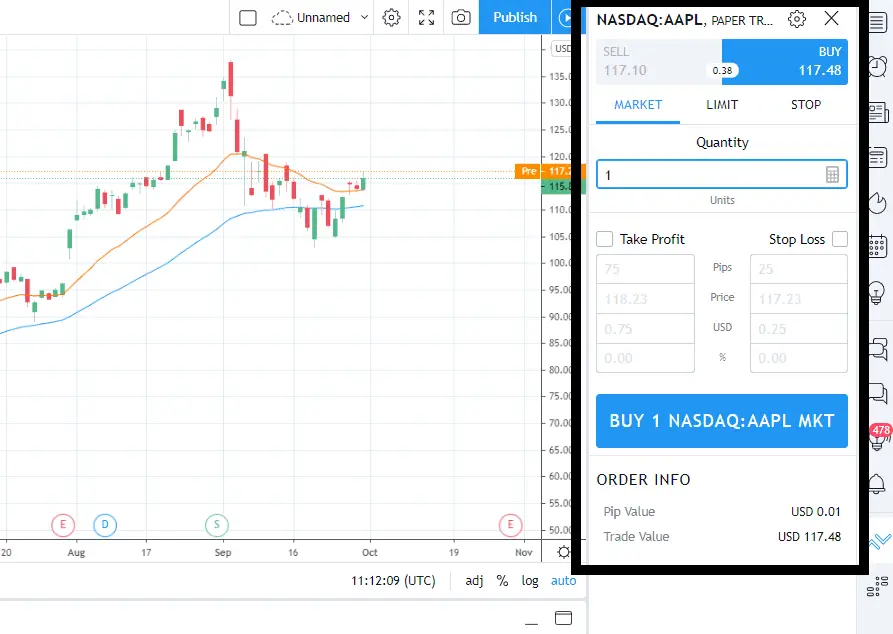
- Step 5*: Fill out order form then click the blue button to confirm the order
*Note: We will discuss the order form in detail in the following section.
Upon confirmation, your order will appear under the Orders or Positions tab in the Paper Trading panel on the bottom of your chart.

New Order
Another way to initiate a trade is via the New Order option:
- Step 1: Right click on any part of your chart > then select Trade (yellow box) then Create New Order (orange box).
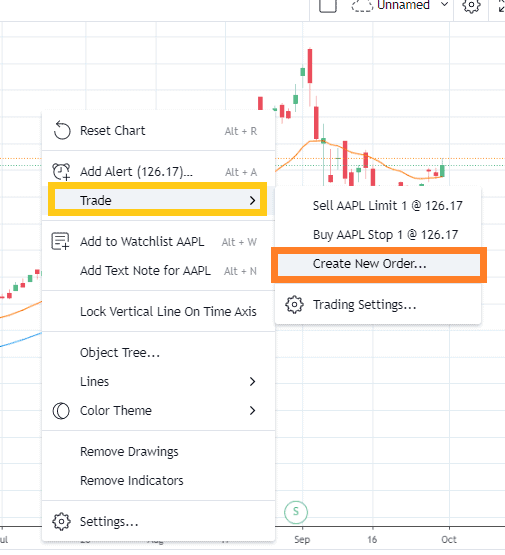
Upon clicking, TradingView will automatically direct you to the Order Panel that we discussed above.
- Step 2: Fill out the order form then click blue button to confirm order
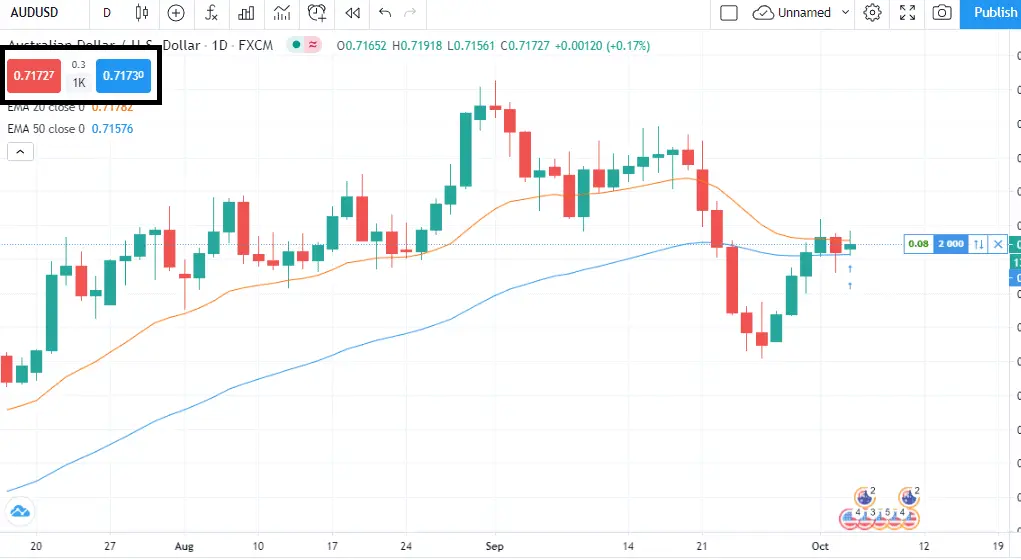
Y-Axis (Price)
Another shortcut is by looking at the Y-axis or the right portion of your chart where the prices of the security are vertically aligned.
- Step 1: Hover at the price level of your choice
- Step 2: Click the plus (+) button on the left of the price
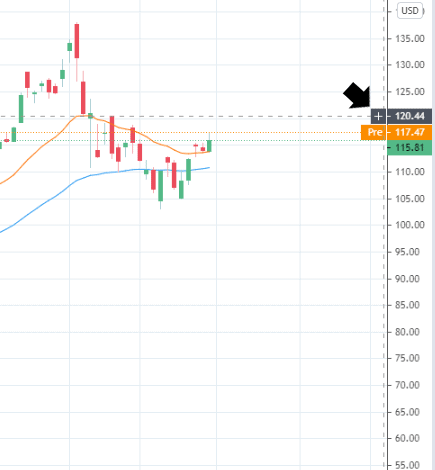
Upon clicking the plus (+) button, a dropdown menu will appear. Direct your attention to the bottom options (yellow box)
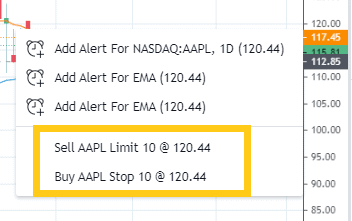
Notice the order types available at this price level. In this example, the sell order type is limited to a limit order whereas the buy order type is limited to a stop order.
Upon selecting your buy/sell order, you will be automatically directed to the order form to input more details.
- Step 3: Fill out the order form then click the blue button to confirm
Step 4: Order Panel
After successfully initiating your trade using any of the alternatives mentioned above, you will be directed to the order panel, which you will find on the right-hand side of your chart. Fill out the necessary fields to complete your simulated order.
In this section, I will describe the fields of the order panel to help you better navigate around the paper trading feature.
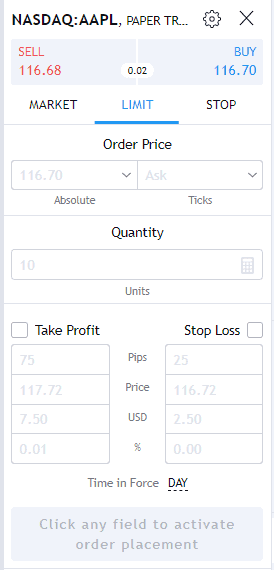
Field # 1: Order Type
The first option is the order type. There are the 3 types of orders in TradingView’s paper trading feature:
Market
Market type is an order to buy or sell a security immediately at current levels. In this type of order, a buy or sell trade is guaranteed to be executed at the current market price.
The order is filled at the current offer price (for buy orders) or bid price (for sell orders)
Limit
Limit order types is an order to buy or sell a security at a limit price or better that is set by the trader. The market needs to move through this price for order to be executed.
Stop
- The purpose of this type of order is to limit potential losses
- A stop order is an order to buy or sell a security once the stock reaches a predetermined price set by the trader. Upon reaching that price, the order then turns into a market order and must be filled.
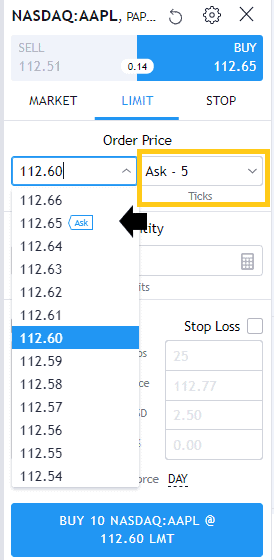
Field # 2: Order Price
Order price consists of two fields:
Absolute
Refers to the absolute value or price you would like to buy or sell a security. Listed in dollar amounts.
This field only applies to Limit and Stop orders
Ticks
- Refers to the number of ticks plus or minus on your selected absolute price
- The tick function gives flexibility by allowing the selection of a limit or stop price through adding or deducting ticks on the current bid (for sell orders) or ask (for buy orders).
Example
In the buy order sample below, the tick criteria indicate an ask – 5. At the current ask price of $112.65 (black arrow), the buy order limit was then set at $112.60.
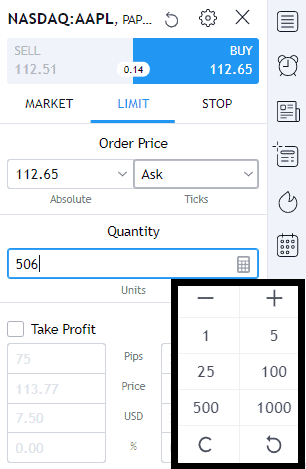
Field # 3: Quantity
The next step is to fill your desired quantity units or the number of shares.
You can either type the figure manually via keyboard or use the calculator function as aid (see black box below).
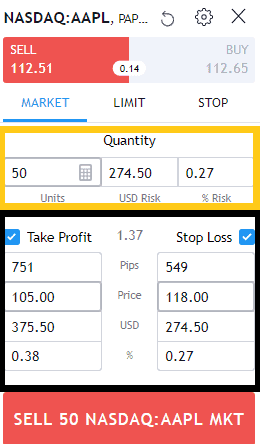
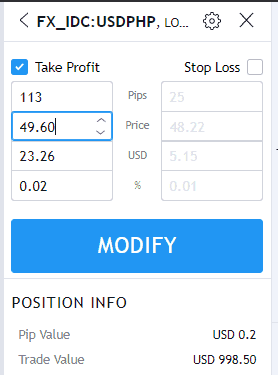
Field # 4: Take Profit and Stop Loss
You can either select only your take profit price or stop loss or select both by ticking both of the boxes.
Subfields
Any of the subfields can be entered depending on your preference. The remainder with be automatically calculated. Its not necessary to complete all fields.
- Pips – Number of Pips away from entry price to set TP or stop loss.
- Price – Set the specific price for TP or stop loss.
- USD – Sets the potential profit (take profit) and/or the risk (stop loss) in USD.
- % – Similar to USD field but in percentage terms.
Step 5: View Order
After sending your paper trade order, the platform will automatically simulate the execution of the order.
Once filled, you will now have an open (simulated) position on that security.
TradingView organizes all orders and positions in the Trading Panel. Details of the order execution are listed in the Trading Panel.
To learn more about the functions of the trading panel refer to the Trading Panel section below.
Step 6: View Paper Trading Account
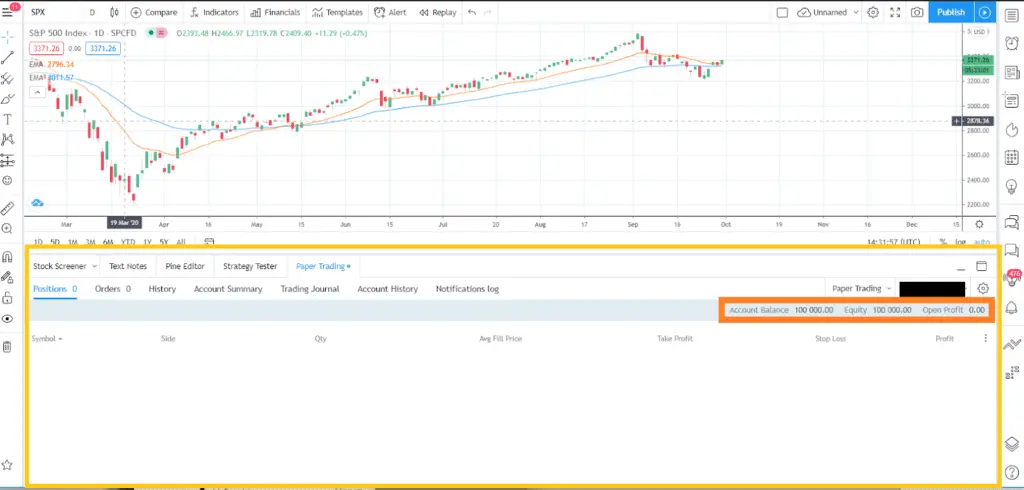
To view your paper trading portfolio account performance, go to the Trading Panel. Your account balance, equity position, and open profit is viewable on the upper right-hand side of the panel. See yellow box below.

TradingView also provides a more detailed history of your account balance. You can check the Account Summary and Account History.
Below is a sample illustration of the Account History function under the Trading Panel.

Signup for a Essential, Plus+ or Premium TradingView subscription using the link. *New users get $15 towards a new plan.
TradingView Trading Panel
In this section I’ll go into a lot more detail about the Tradingview trading panel. The Tradingview trading panel displays all relevant data related to open, closed and pending trades.
The Trading Panel is where the platform logs all order related data including any simulated orders. It keeps displays order status and order details.
The trading panel is one way to modify, cancel, protect, and closed positions.
By default TradingView will credit your simulated account with an account balance of $100,000. You can view this on the upper right corner of the panel:

How to use the Tradingview Trading Panel?
All open positions
- Gives an overview of active simulated trading positions broken down into side, qty, average fill price, take profit, stop loss, and profit.
- User actions: protect and/or close positions from trading panel

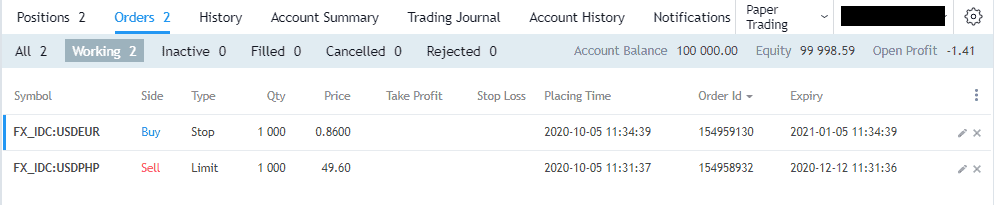
Orders
- Gives an overview of all orders regardless of status; this is broken down into side, type, qty, price, fill price, take profit, stop loss, status, placing time, order ID, and expiry.
- The user can filter the orders by selecting only to view Working, Inactive, Filled, Cancelled, or Rejected
- Possible user actions: modify and cancel orders
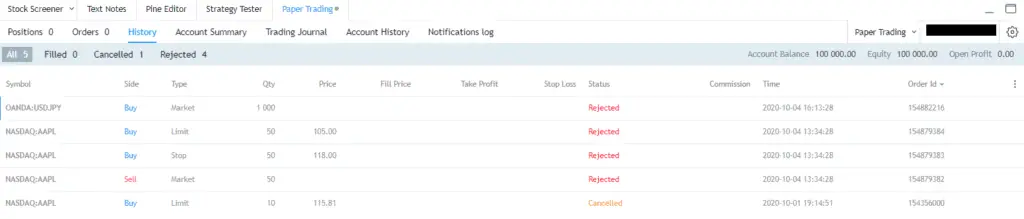
History
- Displays all details of orders initiated including those with Filled, Rejected, and Cancelled status. Users may filter the orders by showing only those that meet a filter condition.
- History tab also shows the side, type, qty, price, take profit, stop loss, time, commission per order made.
Account Summary
- Displays account balance, equity position, and open profit
Trading Journal
- Operates more like a trading log than a journal. It lists and details all actions of an order with a corresponding time stamp.
Account History
- Works in tandem with account summary tab where TradingView shows the changes in your simulated account in terms of before and after Balance, Profit, and action.
Notifications Log
- Similar to Trading Journal but with a more detailed timestamp.
How can I modify/cancel/protect my orders?
Order actions, such as the modification, cancellation or protecting of orders, can also be done through the Trading Panel, specifically the Order and Positions tab.
Modifying orders
- You can modify orders in terms of price, pips, USD, and %.
- To do so, go to the orders tab in the trading panel, then select an order you would like to modify then right click > select Modify Order (see black box below)
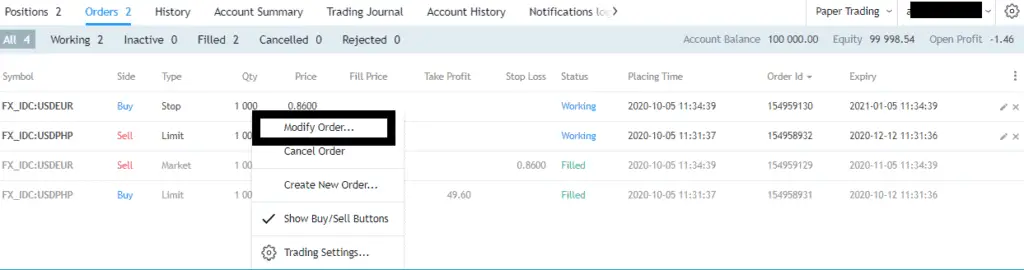
Upon clicking Modify Order, the modification panel will appear on the right-hand side of the chart.
Cancelling orders
- Begin by right clicking on the order you would like to cancel > then click Cancel Order (similar to modify order)

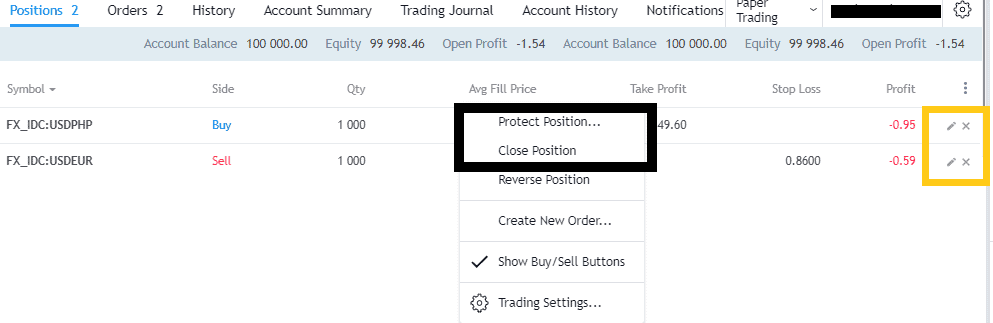
Protecting and Closing Positions
Protecting and closing positions can also be done in the Trading Panel under the Positions tab.
Protect your position by applying take profit and stop loss parameters.
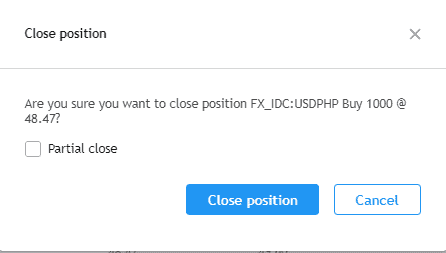
Closing positions is straightforward. This is where you close out open positions. Note that TradingView allows to partially close positions.
To protect/close positions, simply right click on a position > select protect/close position (black box). An alternative to right clicking is to click the pencil (to protect position) or the “X” button (to close position). Refer to yellow box below
How do I reset my Tradingview account?
By default, TradingView credits a $100,000 simulated money for paper trading.
If you’d like to rest your TradingView paper trading account back to the starting balance or set it to any other starting balance follow these steps.
Step 1: Go to the Brokerage account tab at the bottom of any chart.
Step 2: Select the Drop down tab next to your account name.
Step 3: Select ‘Reset Paper Trading Account‘
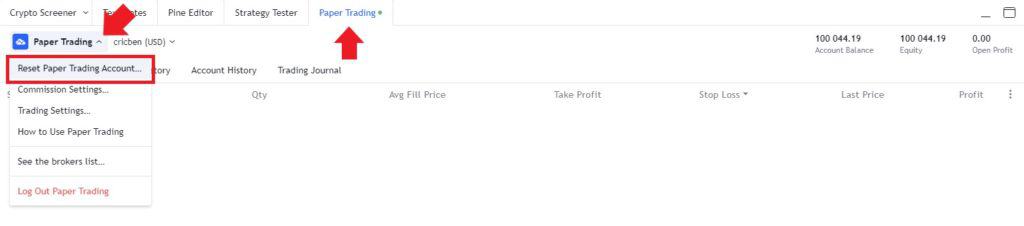
Step 4: Select the new balance of your reset account.
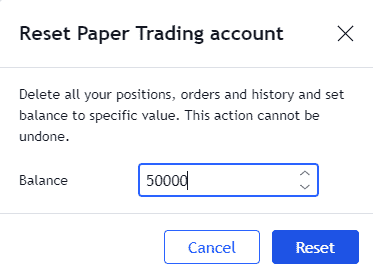
Chart Settings
To customize paper trade settings. Right click on any area of the chart > click Settings > then select Trading on the settings window.
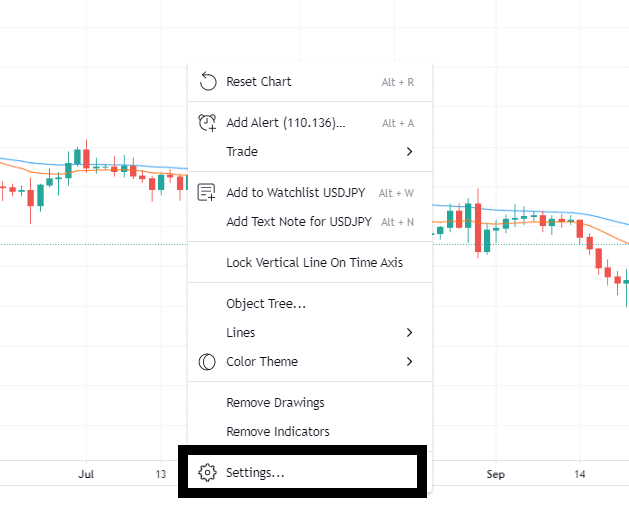
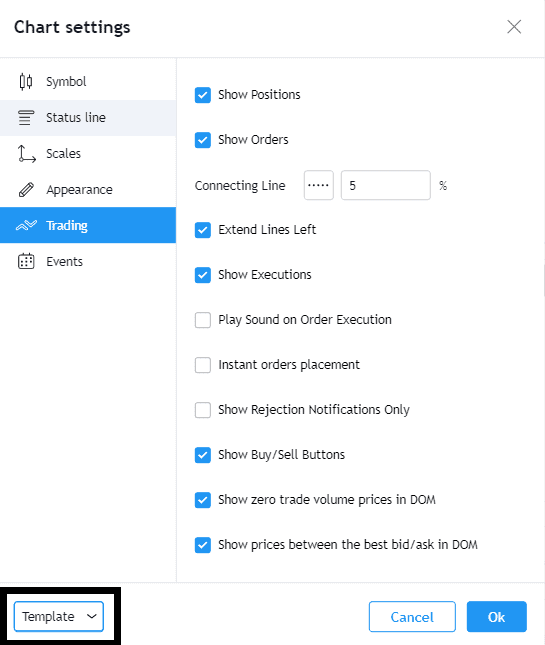
Chart settings that can be configured include:
Show Positions
- Ticking this box will annotate your charts with open positions in your simulated portfolio
- Annotation details show the side, price level (as indicated by the dotted line), and quantity
- The placement of the annotation indicates the average fill price for that position
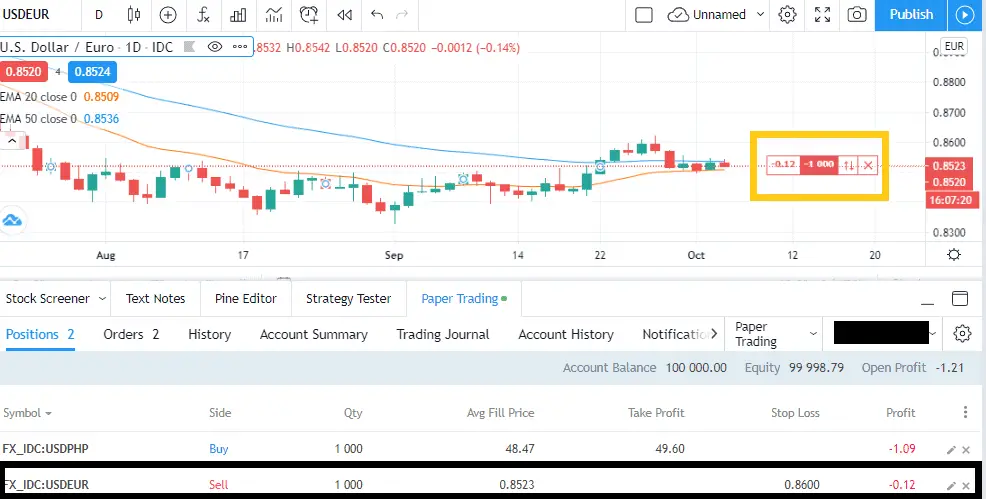
Yellow box: annotation of open selling position on USDEUR
Black box: specific position shown on the chart (reference)
Show Orders
- Ticking the Show Order box will annotate your chart with your working orders. These are any active orders not yet executed such as take profit orders or stop loss orders..
- The annotation will include the side, order type (limit/stop), quantity, and price level (as indicated by the dotted line).
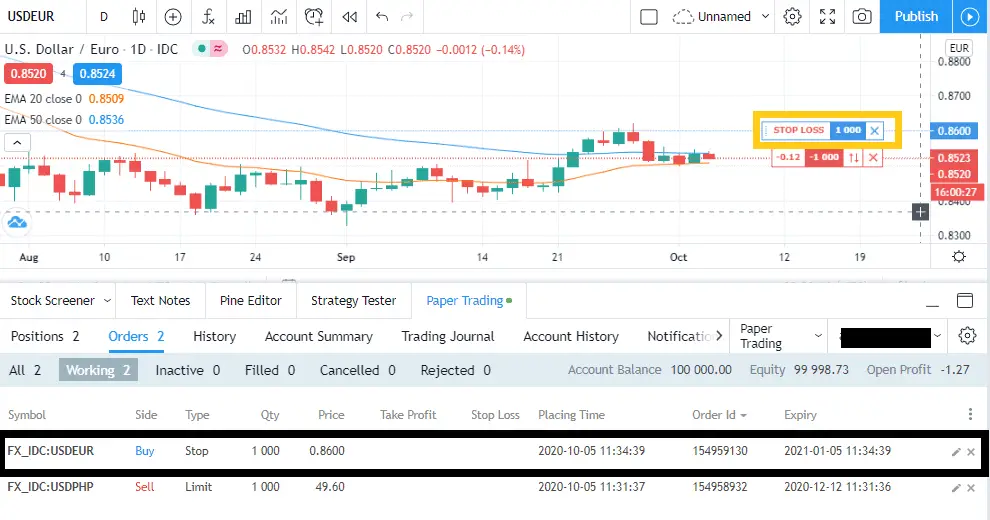
Yellow box: annotation of STOP LOSS order on EURUSD
Black box: specific position shown on the chart (reference)
The above order is part of the same EURUSD position used in the “show positions” example above but with a protective parameter on my open position through stop loss placement.
Connecting Line
Adjust the placement of annotations by indicating how far or near the annotations are from the Y-axis (price)
Setting the % to 0 will bridge the gap of the annotations to the Y-axis
Extend Lines Left
Ticking this will simply extend the line that denotes the price level for orders and position annotations.
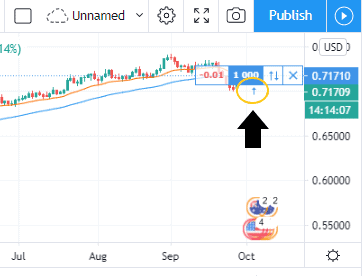
Show Executions
Shows where the order was executed/filled (yellow circle and black arrow)
Play Sound on Order Execution
Ticking this box will enable the sound notification upon execution of an order
Instant Orders Placement
Displays the instant order panel in the upper left hand side of your chart. This provides a quick way for you to instantly execute buy and sell trades at market.
Show Rejection Notifications Only
This option allows the user to only get notifications when an order is rejected by the system
An example of a condition that rejects an order is executing trades during off market hours.
Show Buy/Sell Buttons
The buy and sell buttons provide a convent way to place orders. Buy/Sell buttons direct users to the trading panel to execute trades. Note: This is different to the instant order placements.
Signup for a Essential, Plus+ or Premium TradingView subscription using the link. *New users get $15 towards a new plan.