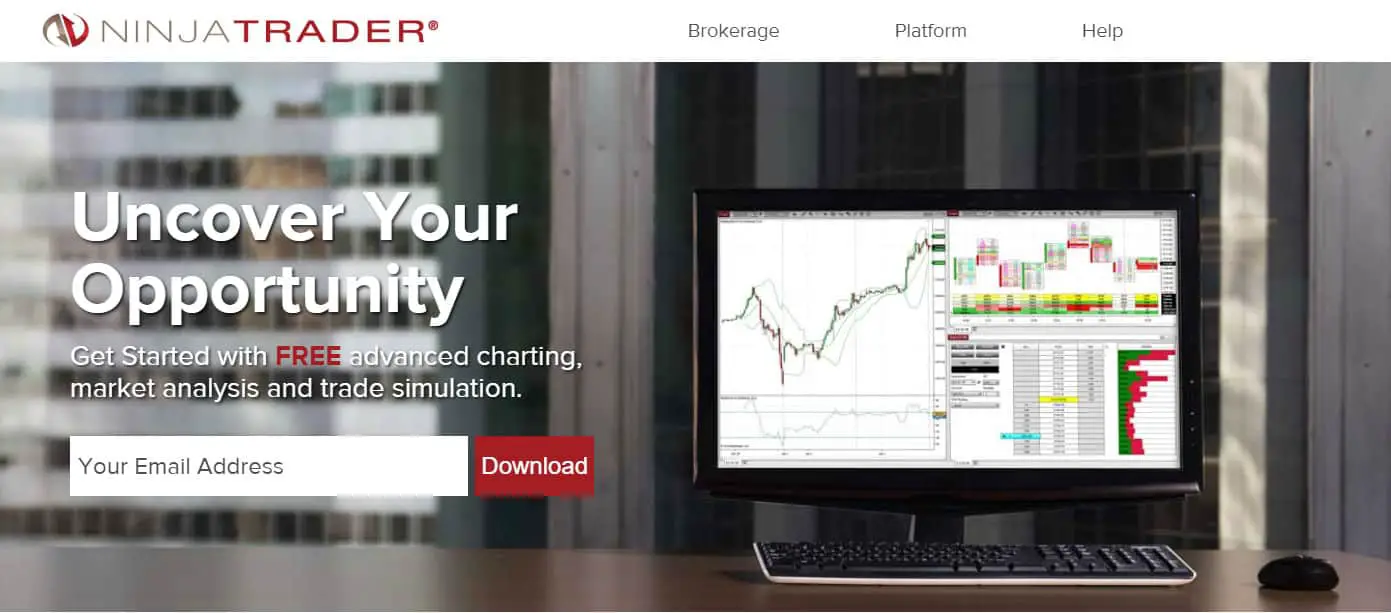
If you are planning to become serious about your trading, it’s so important to have the right tools. One tool every trader needs is a quality trading platform. Ninja trader is widely regarded as one of the best and most affordable trading platforms on the market today.
In this guide I will describe step by step how to use NinjaTrader 8. From how to download and install NinjaTrader 8. How to open a NinjaTrader demo account. How to use NinjaTrader templates and workspaces. How to add indicators in NinjaTrader 8. How to use chart trader for order execution. How to use market replay and how to open a NinjaTrader brokerage account.
What is NinjaTrader
NinjaTrader 8 is a software platform and brokerage service for forex and futures trading. The platform features include an easy to use interface, multiscreen functionality, customizable charts and tool properties, Market replay function, on chart order execution and modification. The platform also has plenty advanced features including C# framework for developers to build custom indicators, drawing tools and automated strategies.
If you are interested in finding out more about using NinjaTrader 8 the following guide provides a complete overview of how to get started and how to use NinjaTrader 8 and many of the basic functions to get the most out of the platform.
How to download NinjaTrader
NinjaTrader 8 is free to download and open a demo account. If you don’t already have NinjaTrader installed heres how:
- Click the link to open the ninjatrader website.
- At this home page in the bottom left hand corner enter in your email.
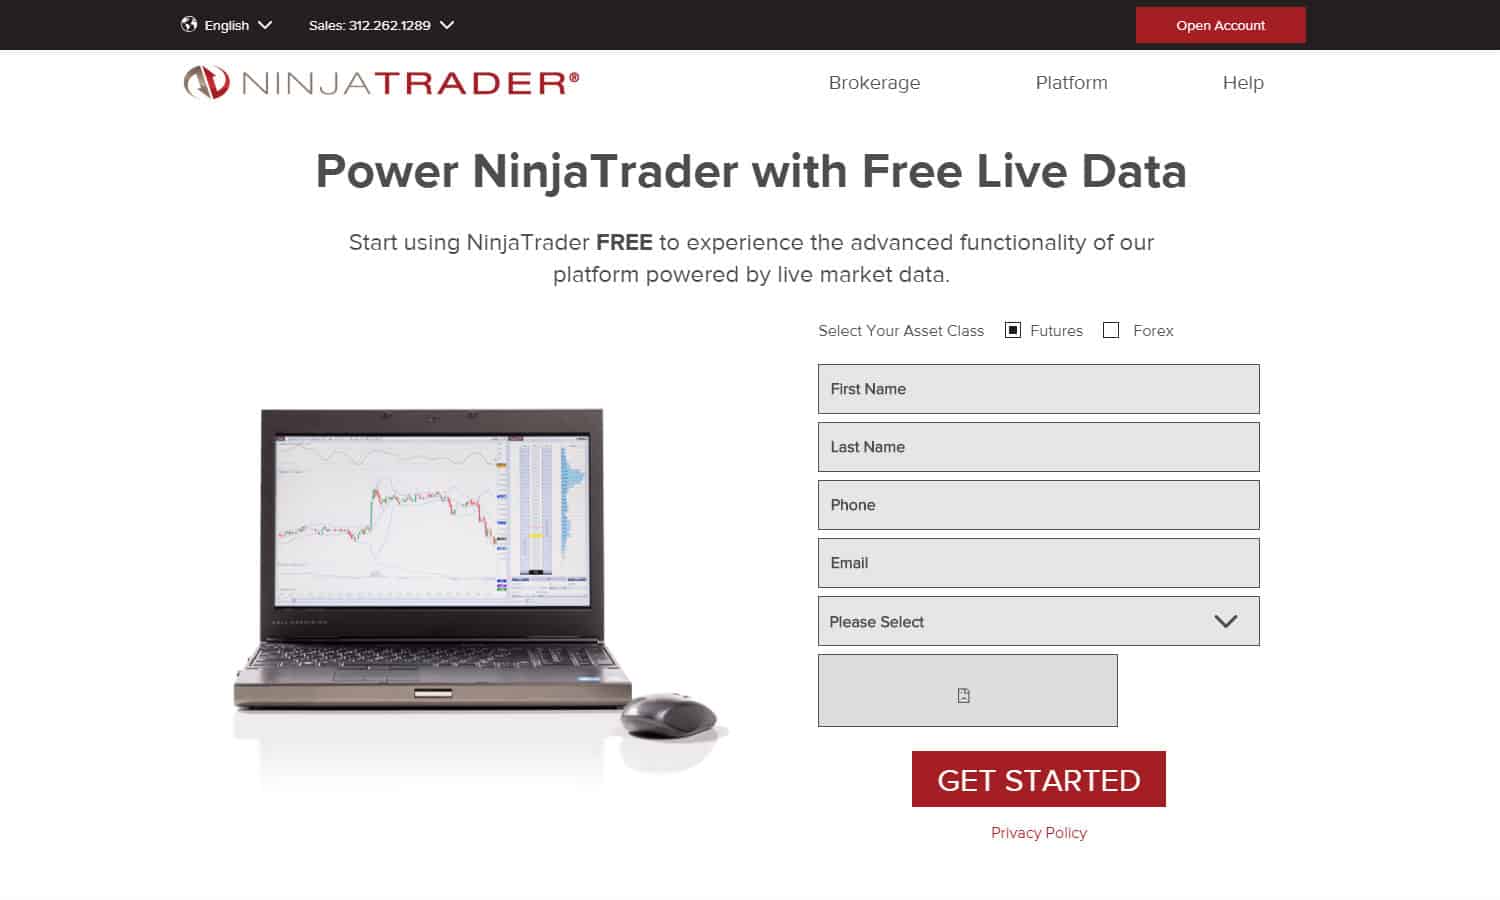
- In the popup window you will be asked: ‘Do you want FREE live market data’ select ‘Yes’.
- In the expanded popup window enter you details
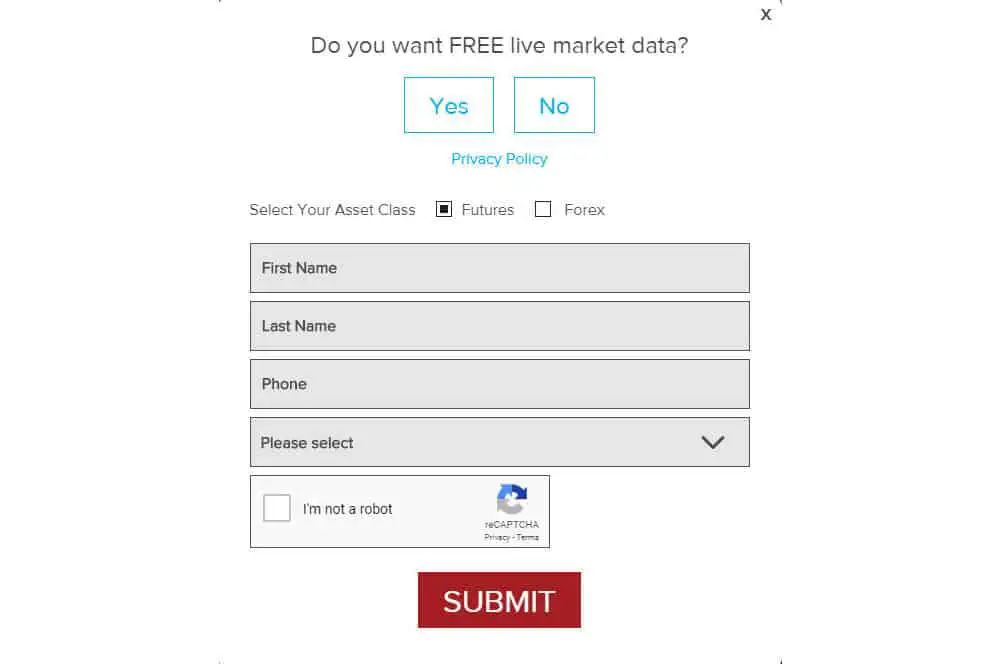
- Select ‘Submit’
This will take you to a new page.
- In the dropdown tab select the version of NinjaTrader you want to download. In this case select ‘NinjaTrader 8’.
- Select ‘DOWNLOAD’
What are the PC requirements for NinjaTrader 8
The minimum PC requirements for NinjaTrader 8 are:
- Windows Vista (SP2) w/ Platform Update, Windows 7, Windows 8, Windows Server 2008 w/ Platform Update, Windows Server 2008 R2 or later.
- 1 gigahertz (GHz) or faster 32-bit or 64-bit processor
- 2GB RAM
- Microsoft .NET Framework 4.5(pre-installed on most PC’s and can be downloaded here: Microsoft .NET Framework)
- Screen resolution of 1024 x 768
- DirectX10 compatible graphics card
If you’re in the market for a new laptop or PC see my favorite computers and equipment. Including multi monitor setup equipment.
How to Install NinjaTrader
After selecting ‘DOWNLOAD’.
- Select the folder where you want to download the installation file.
- Once the download is complete, locate the installation file on your PC.
- Double Click the ‘NinjaTrader.Install’ file to start the installation wizard
- Follow the prompts by selecting ‘Next’. Once you have reviewed and agree to the terms of service agreement, check the box and continue by selecting ‘Next’.
- Select the installation folder. The default location is ok.
- Select the ‘Install’ button to begin the installation.
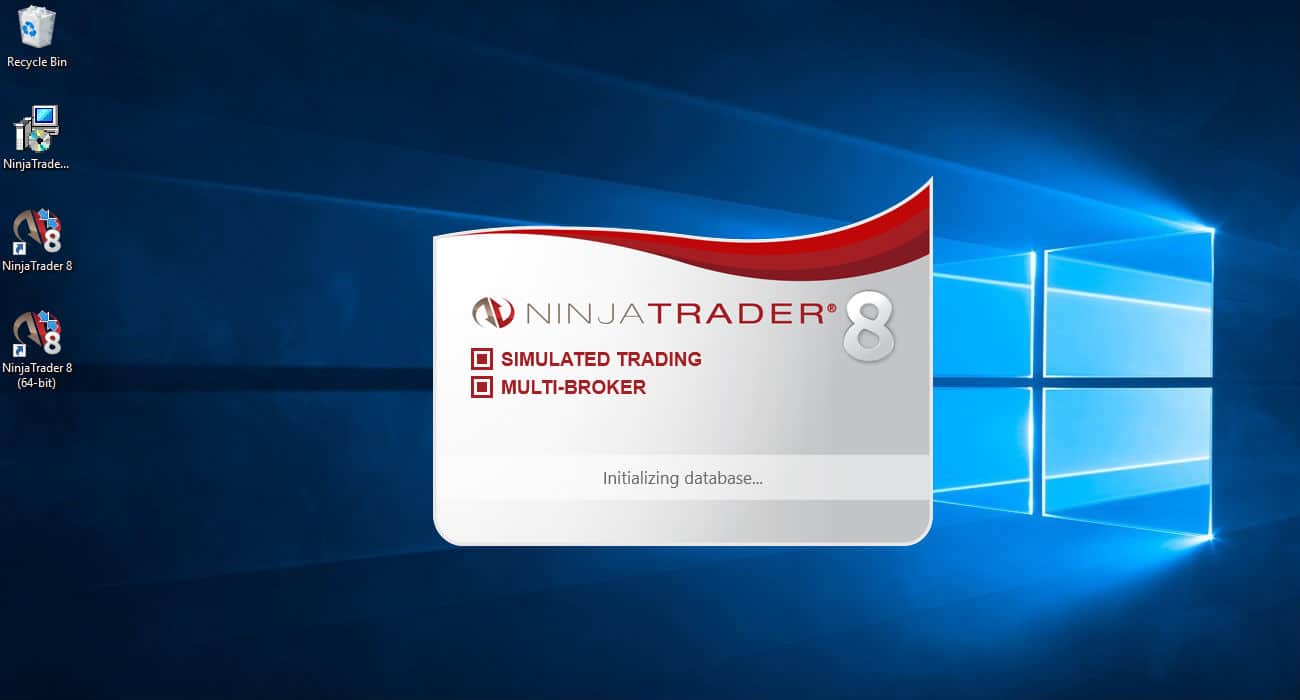
- Once NinjaTrader has installed select the ‘Finish’ button
The NinjaTrader icon should appear on your desktop or in our list of applications. Double click the icon to launch. Use NinjaTrader (64-bit) for optimal performance.
How to install NinjaTrader on a Mac?
There is no installation file that allows NinjaTrader to be installed directly on a Mac. NinjaTrader runs on the .NET framework which requires a Windows operating system. Ninjatrader can be run on a Mac by either installing Virtual Machine software or Apple Boot Camp to run windows on top of Mac hardware.
I have written a detailed post that describes step by step how to run NinjaTrader on a Mac. Click here to view post.
How to open a NinjaTrader demo account
If you have just downloaded NinjaTrader using the instructions described above you will have already been sent your new ‘Demo account’ details.
If you already have NinjaTrader installed from a previous trial, use the following link to get a new ‘Demo account’. Click here to sign up for a new demo account.
This free demo accounts will give you 2 weeks access to live market data. When it expires you’ll need to sign up again. You will be limited to 2 free trials per email account.
Alternatively, when you fund a new account you get indefinite access to the data feed, allowing free demo trading. Click here to find out how to open a brokerage account.
How to connect to Ninja Trader data feed
Once you have received your new user name and password via email. You can access the live data feed connection for either demo or live trading. In the following example I will demonstrate how to connect via a demo account. The process is similar for a brokerage account.
- From ‘Control Center’ window top bar select ‘Connection’ and ‘Configure’

- From the Connections window in ‘Available’ scroll down to ‘My Ninjatrader Continuum’. In ‘Configured’ select ‘add’. The new connection should appear in the ‘Configured’ section. (If already in this list just select ‘My NinjaTrader Continuum’). In ‘Properties’ enter your new ‘username’ and ‘password’ sent via email. Choose ‘Connect on start up’ if you prefer and make sure ‘Demo’ is checked. Click ‘Apply’. A NinjaTrader Continuum Disclaimer will appear, read and select ‘OK’ to continue.
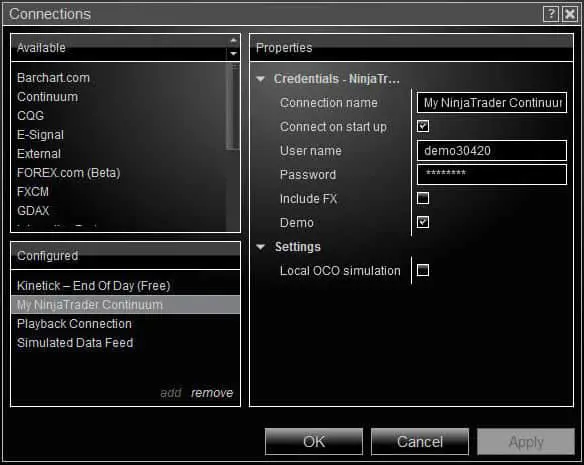
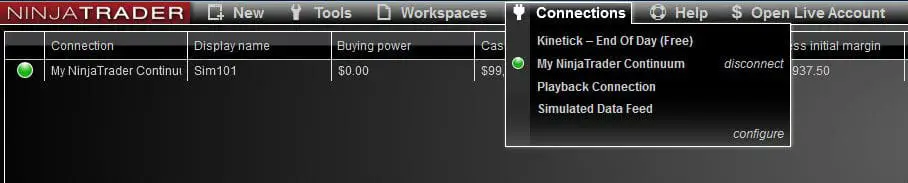
- Back in the control centre select ‘Connections’ in top bar. Select your new ‘My NinjaTrader Continuum’ connection. A round light to the left of the connection will start ‘Yellow’ while connecting. When connected it will turn ‘Green’. You are you now connected to the live data feed.
How to make an ‘Instruments List’ in NinjaTrader 8
Before opening a chart lets define a list of market instruments to be loaded onto the charts. The NinjaTrader ‘Instrument List’ is a list of saved favourites that are regularly traded. this makes it easier to navigate between each instrument from a single chart.
Note: An alternative to using an instrument list to change instrument (if you know the instrument code) is click on the chart and start typing the code. A text box will appear and the instrument will change.
To add instruments to the NinjaTrader ‘Instrument List’:
- Go to ‘Control Center’ -> Tools -> Instrument List.
- Select the Market Vehicle from the ‘Lists’ Window then select the Instrument code from the ‘Instruments’ window. Select add and enter the instrument code.

How to open a new chart in NinjaTrader 8
To open a new chart:
- In the ‘Control Center’ window select New. In the drop down tab select Chart.
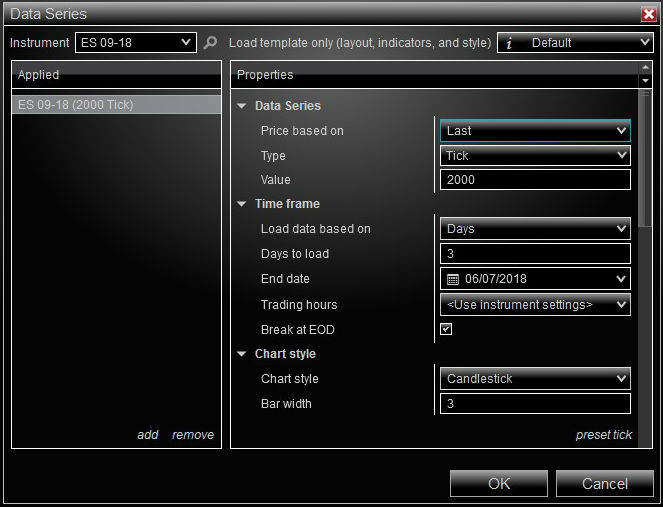
- From the ‘Select’ tab choose the instrument data to load either from the summary of instruments list at the top or from the market vehicle lists (previously created) towards the bottom.
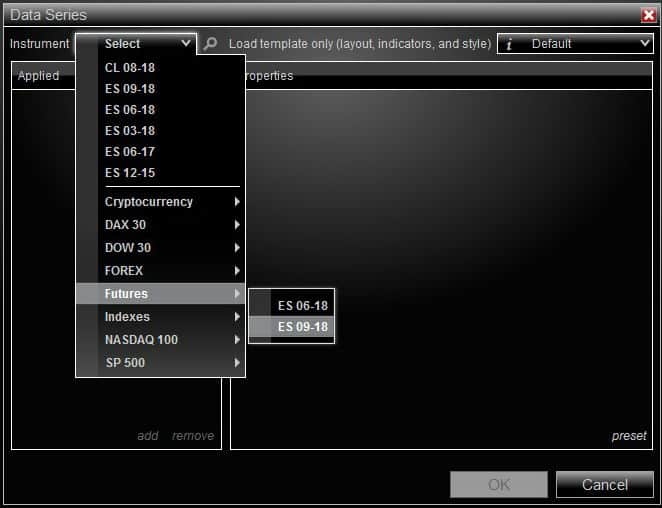
- Customize the chart properties in the ‘Properties’ window. When done select ‘OK’. The new chart with instrument data will load.
How to use drawing tools in NinjaTrader 8
How to change chart properties in NinjaTrader 8
How to add indicators to NinjaTrader charts
NinjaTrader 8 comes with a number of built in indicators that can be added to any chart. To add an indicator to NinjaTrader charts.
- Right click anywhere on the chart. The following popup menu will appear. Select Indicators.
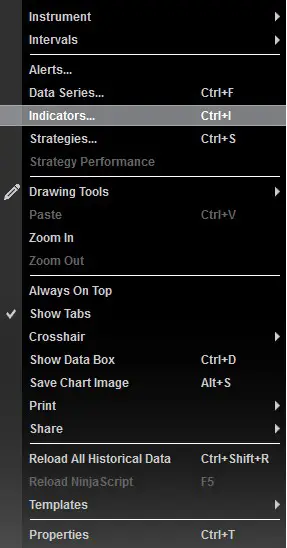
- The Indicators menu will appear. In the ‘Available’ window select the indicator you want to load.
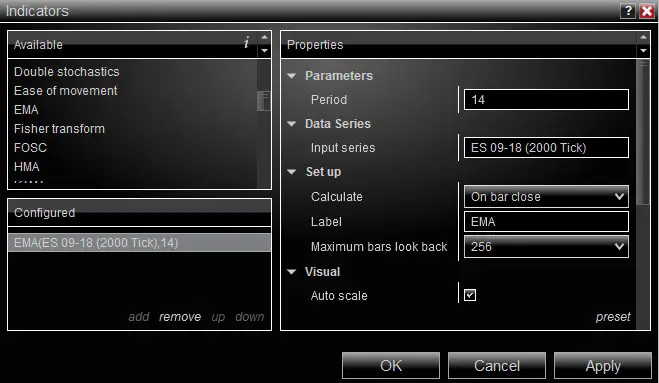
- In the ‘Configured’ select add. The indicator will appear in the ‘Configured’ window.
- In the ‘Properties’ window you can customize the indicator properties as required.
- To add the indicator to the chart, click Apply. the indicator will appear on your chart.
How to import indicators into NinjaTrader
NinjaTrader comes installed with a large list of indicators ready to to use. Outside of this list the NinjaTrader community has a huge range of custom indicators available for free download and also to purchase from third party providers.
- For a list of free indicators from the Ninjatrader community forum click here*
- For a list of third party indicator providers click here
*Learn more about downloading and importing FREE Ninjatrader indicators here.
To import indicators into NinjaTrader:
- Download selected indicator from one of the mentioned resources to your computer (anywhere of your choosing).
- In the ‘Control Centre’ window select Tools -> Import -> NinjaScript Add-On…
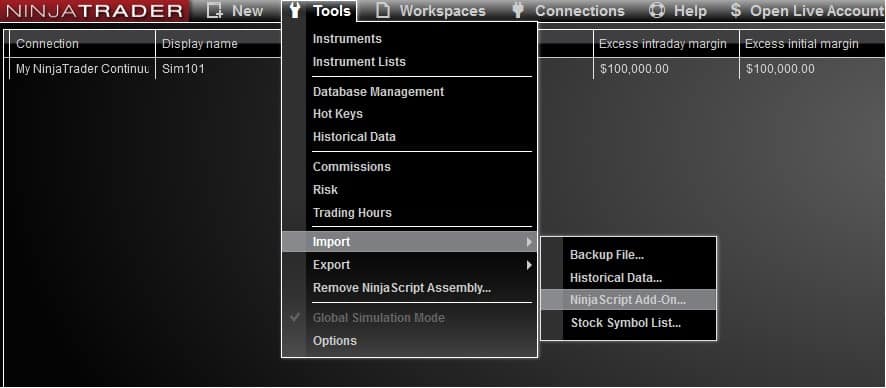
- Find and select the indicator to import from the your machine.
- A ‘warning’ box will appear, select OK to continue
- When the indicator is installed an ‘Import’ box will appear notifying you on successful script import. Select OK.
- Add the indicator to any chart the same way described in the ‘how to add indicators to NinjaTrader charts’ section above.
How to use NinjaTrader templates and workspaces
Convenient features of the NinjaTrader platform are templates and workspaces. They allow users to quickly and easily setup preferred chart and trading desktop configurations.
- Templates – Chart templates allow users to create files that contain a list of indicators and indicator settings. It doesn’t contain information relating to instruments or chart bars.
- Workspaces – Allow users to create a file that contains information for multiple charts and there locations on a single or multiple monitors. Workspaces also allows users to configure and save chart instruments and bar settings.
How to use NinjaTrader templates
- To setup a template right click anywhere on the chart setup. Select Templates then Save As.
- In the ‘Save As’ window enter your preferred chart name and click Save.
How to load a NinjaTrader template
To load a template – open a new chart (see ‘how to open a new chart’ section above). Right Click anywhere on chart. Select Templates then Load. Select the chart template to load.
Where are NinjaTrader chart template files stored?
Chart templates can be shared and imported to other machines running NinjaTrader.
Ninjatrader automatically creates a local ‘NinjaTrader 8’ folder under ‘Documents’. To locate template files go to Documents. Open the Ninjatrader 8 folder. Select Templates-> Chart and find the Template.
How to use NinjaTrader workspaces
- To setup a workspace. First go to the ‘Control Center’ window. In the top bar select Workspaces. In the drop down window select New.

- Select the name of the new workspace.
- Return to the Workspaces tab in the ‘Control Center’ top bar and select the new workspace. All charts and windows will now disappear. Leaving a clean workspace to build.

- Setup and compose charts and supporting windows on a single or multiple monitors. Then return to the ‘Control Center’ window. In the Workspaces dropdown menu highlight your workspace name and select save. Your workspace is now setup!
How to load a NinjaTrader workspace
To load a workspace go to ‘Control center’ top bar and select ‘Workspaces’ in the dropdown window select preferred workspace. To have the workspace open next time you start NinjaTrader. ‘Save’ the workspace before exiting.
Where are NinjaTrader workspace files stored?
Workspace files can be shared and imported to other machines running NinjaTrader.
Ninjatrader automatically creates a local ‘NinjaTrader 8’ folder under ‘Documents’. To locate the workspace files go to ‘Documents’. Find and double Click the ‘Ninjatrader 8’ folder. Select ‘Workspaces’ and find the workspace.
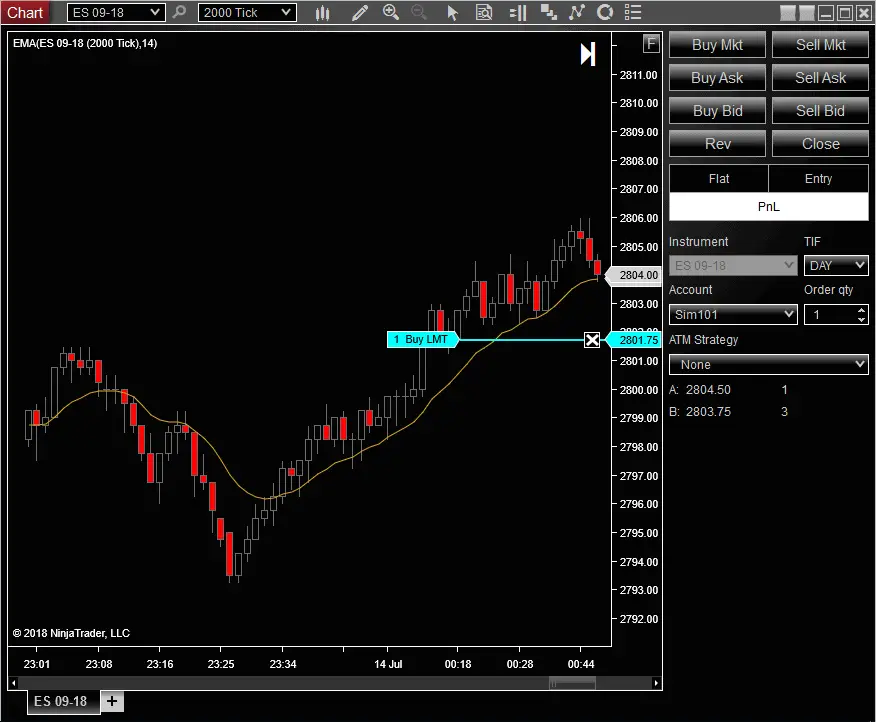
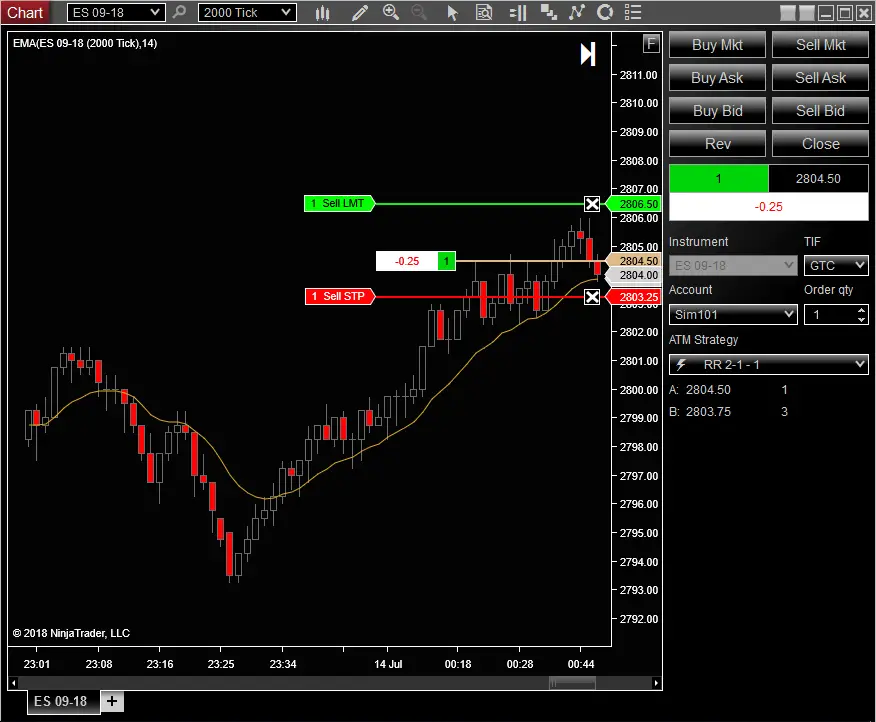
How to use NinjaTrader ‘Chart Trader’
One of the most user friendly features of the NinjaTrader platform is the ‘Chart Trader’. Chart Trader provides a visual interface that allows users to add, amend or cancel orders directly from the chart.
To access chart trader open any chart. In the top bar select the ‘Chart Trader’ icon and select ‘Chart trader’ from the drop down menu.

The ‘Chart Trader’ panel will open on the right hand side of the chart. Note: If trading ‘live’ through any brokerage, ‘Chart Trader’ is ONLY available using the ‘lease’ or ‘Lifetime’ license options. It’s NOT available using the ‘Free’ license.
In the ‘Chart Trader’ panel are options for placing trade orders:
- The most basic orders are ‘market’ orders and ‘buying’ or ‘selling’ on the ‘Ask’ and ‘Bid’.
- ‘Rev’ – Reverse positions
- ‘Close’ open positions.
- ‘Instrument’ being traded.
- ‘TIF’ – Time in Force, with 3 options:
- DAY – Orders are held open only for the trading day;
- GTC – ‘Good til Cancelled’ Orders are held open until cancelled; and
- GTD – ‘Good til Date’ Orders are held open until a specified date. Below this is a tab to select the account to be traded; ‘Sim’ or ‘Live’ account.
- ‘Order Quantity’: how many contracts are to be traded.
- ATM strategy; this automates placement of take profit stop loss buy or sell limit orders. See ‘How to use NinjaTrader ATM strategies’ section below for more details.
How to enter orders on a chart
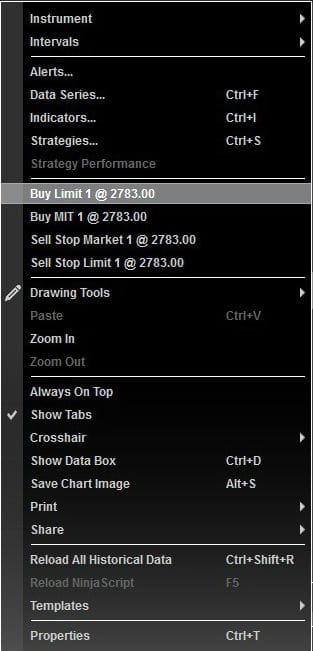
There are four types of orders that can placed using the on chart trading feature:
- Limit order – is an order to buy or sell at a specific price or better. A Limit ‘buy’ order can be executed a the limit price of lower and limit ‘sell’ order can be executed at the limit price or higher.
- MIT (Market if Touched) – Is a conditional order that becomes a market order when the market reaches a specified price.
- Stop Market Order – Also known as a stop loss order. It becomes a market order once the market reaches a specified price. Despite the name, stop market orders are also commonly used to enter the market.
- Stop Limit Order – Opens a limit order once price reaches a specified price. The Limit order executes at the specified price or better.
To open an on screen order using ‘Chart Trader’:
- Right click on the screen where you want to place the order. For example if you want to place a buy limit order right click below the current price.
- Select the order type you want from the pop up window. The order will appear on the chart as an order ‘Flag’.
- To amend the price that the order will execute. Drag the flag to the correct price. To cancel the order left click on the ‘X’. The order type and number of contracts will show on the left of the flag.
Stop losses and take profit orders can be placed the same way. A better way how ever is to set stop loss and take profit orders automatically using ATM strategies. This will be discussed in the following section.
How to use NinjaTrader ATM strategies
Automatic Trade Management Strategies (ATM) are a great way to automate stop loss and profit target order placement. It also offers several other features to automate trade management including multiple target placement, trailing stops, moving stop loss to break even and more.
ATM Strategies have 3 major benefits:
- No need to manually enter orders or manage orders; saving time and allowing traders to focus on the open trade.
- Get orders in queue as early as possible to get the best fill.
- Helps define and set trading rules.
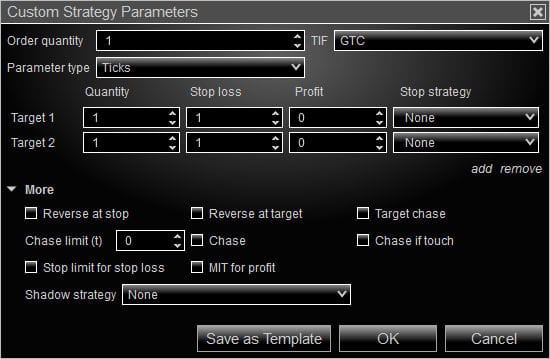
Setting an ATM Strategy
In the ‘Chart Trader’ panel on the right of an open chart. Select ‘Custom’. A Strategy Parameters box will appear. In this box all the parameters for a new strategy can be set:
- Order Quantity – The number contracts to execute. This can be preset here or entered in the main ‘Chart Trader’ panel.
- TIF ( Time in Force) – Order expiration type. This can be set to DAY, GTC (good til cancelled) or GTD (good til date).
- Parameter Type – This is the unit of measure away from the entry price. Options include: Price, Percent, Tick, Pip…
- Target – Nominate single or multiple target/s. Define the quantity of contracts per target and the number of units to place the stop loss and profit target from the entry price. To add more or remove targets select add.
- Stop Strategy – Under the ‘Stop strategy’ tab select ‘Custom’. The ‘Custom Stop Strategy Parameters’ window will open.
- Auto Breakeven – This enables the stop loss order to be moved once price has moved in your favour a specified amount. ‘Profit Trigger’ is the ‘Parameter amount’ that price can move in your favour before the stop loss is moved. ‘Plus’ allows you to nominate the ‘Parameter amount’ that the stop loss will be moved relative to breakeven price.
- Auto Trail – Allows you to trail your stop. 3 steps give the flexibility to adjust the auto trail parameters as price moves in your favour. ‘Profit Trigger’ is the ‘Parameter amount’ that price needs to move in your favour for a step to be activated. ‘Stop loss’ is the ‘Parameter amount’ that the stop loss is placed relative to the ‘Profit Trigger’ price. ‘Frequency’ is the ‘Parameter amount’ that price needs to move to trigger the stop loss to be moved.
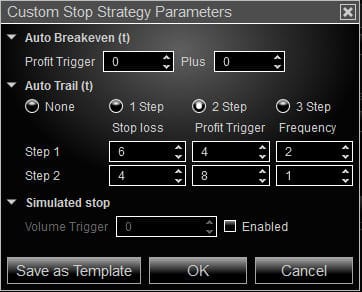
Simulated stop – Requires a ‘volume trigger’ to be set. An order will only trigger if the ask volume for a buy or bid volume for a sell order is above the specified ‘volume trigger’ limited.
under ‘More’:
These parameters are for more advanced ATM strategies.
- Reverse at stop – Order reserves when stop hit
- Reverse at target – Order reserves when target hit
- Target chase – If the profit target is touched but not filled and price starts to move in the opposite direction. The profit limit target order then moves towards the current price until the ‘Chase limit’ is reached.
- Chase – NinjaTrader will automatically adjust your entry limit order towards current price with each tick that the market moves away from your original order until the ‘Chase limit’ is reached.
- Chase if touch – Similar to ‘Chase’ except the chase function doesn’t start until the order price has been touched.
- Stop limit for stop loss – Stop loss limit order executes at specified price or better.
- MIT for profit – Executes a ‘Market order’ if profit target price is touched.
- Shadow strategy – This is a method for forward testing alternative trade management strategies. Shadow strategy opens a simulated position (e.g Sim101 account) simultaneously with the live position. This allows traders to forward other concepts using the same entry signals.
How to use NinjaTrader market replay
Market replay is another excellent feature of NinjaTrader. It allows simulation trading of any market at anytime. It’s perfect beginner traders who can’t always be at the market open.
Market replay provides a full data replay of any days trading. Market data can be replayed at real time speed or sped up in multipliers of 2x, 3x, 4x, 6x, 8x,10x, 15x, 20x, 30x,50x,100x and 500x.
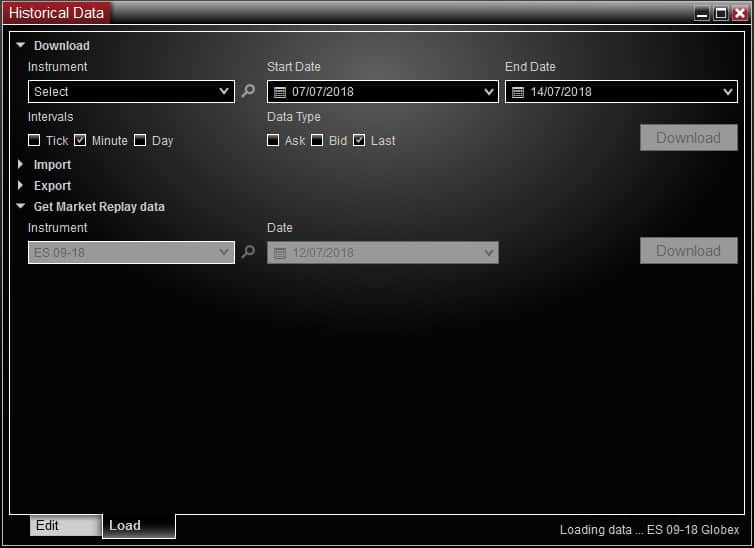
How to download market replay data
To download market replay data:
- Connect to live data feed as described in ‘How to connect to Ninja Trader data feed’ – step 3 (In Control Centre top bar: Connections -> Select your Connection)
- Return to the ‘Control Centre’. Select Tools then Historical Data.
- In the Historical Data window click on the Load tab at the bottom of the window.
- Select the Get Market replay Data drop down menu. This is where we download the data so we can play it back.
- Select the ‘Instrument’ and the ‘Date’ to download. Click on Download. in the bottom right hand corner of the window you should see ‘loading data…’
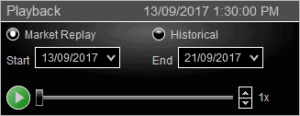
How to play market replay data
- Return to the ‘Control Centre’ select Connections in top bar and disconnect from your data connection. You need to disconnect from one connection before connecting to another.
- Select Connections again. This time connect to Playback Connection.
- Once you are connected a ‘Playback’ box will appear. This box allows you to control the market replay ‘Date’ start and End, ‘Time’ and Replay speed.
- Select Market Replay then the Start and End date. Then use the slider to select the time to start the market replay.
- Click the Play button to start the market replay.
How much does NinjaTrader Cost
There are 3 key license options for using NinjaTrader. The free version of NinjaTrader only offers a simulated trading option. To trade live on the NinjaTrader platform you will need to either purchase a ‘Lease’ or ‘Own’ a license key.
‘FREE’ license option – Core Essentials
- Advanced Charting
- Market Analysis
- Simulated Trading
Cost: Free
‘LEASE’ license option – trader+
The lease option includes everything included in the FREE license plus:
- Automatically submit protective stop loss and profit target orders (ATM Strategies)
- Chart Trader
- One Cancels Other orders (OCO)
- Order Entry Hotkeys
- Custom Indicator, Strategy & Trading App Development
- Automated Trading & Backtesting
- Advanced Alerting System
- Enhanced SuperDOM
- Modify Orders via Indicators
- Tabbed Window Management
- Auto-Close Positions
Brokerage: See ‘How to open a NinjaTrader Brokerage account’ section below
Cost: For an up to date list of licence costs click here
‘OWN’ license option – Order Flow+
The lease option includes everything included in the FREE and LEASE licenses plus:
- Volumetric Bars (footprint style chart)
- Market Depth Map
- Volume Profile Indicator (Coming soon)
- Volume Profile Drawing Tool (Coming soon)
- Trade Detector
- Cumulative Delta
- VWAP with Deviation
Brokerage: See ‘How to open a NinjaTrader Brokerage account’ section below
Cost: For an up to date list of licence costs click here
How to open a NinjaTrader Brokerage account
One of the drawbacks of using NinjaTrader is the limited selection of Brokers offered for use with the platform. The ‘NinjaTrader Brokerage’ does however offers some of the most affordable fees and lowest margin requirements available anywhere. The following is a list of brokerage options:
List of Futures Brokers
- NinjaTrader Brokerage; this includes 2 options:
- Dorman
- Phillips Capital
- Interactive Brokers
- TD Ameritrade
List of Forex Brokers
- NinjaTrader Brokerage; this includes 2 options:
- Oanda
- Forex.com
- Oanda
- Forex.com
- City Index
- FXCM (Non-US)
- Interactive Brokers
- TD Ameritrade
List of commissions and margins requirements:
- Futures – For a pdf file of the latest NinjaTrader brokerage commissions click here.
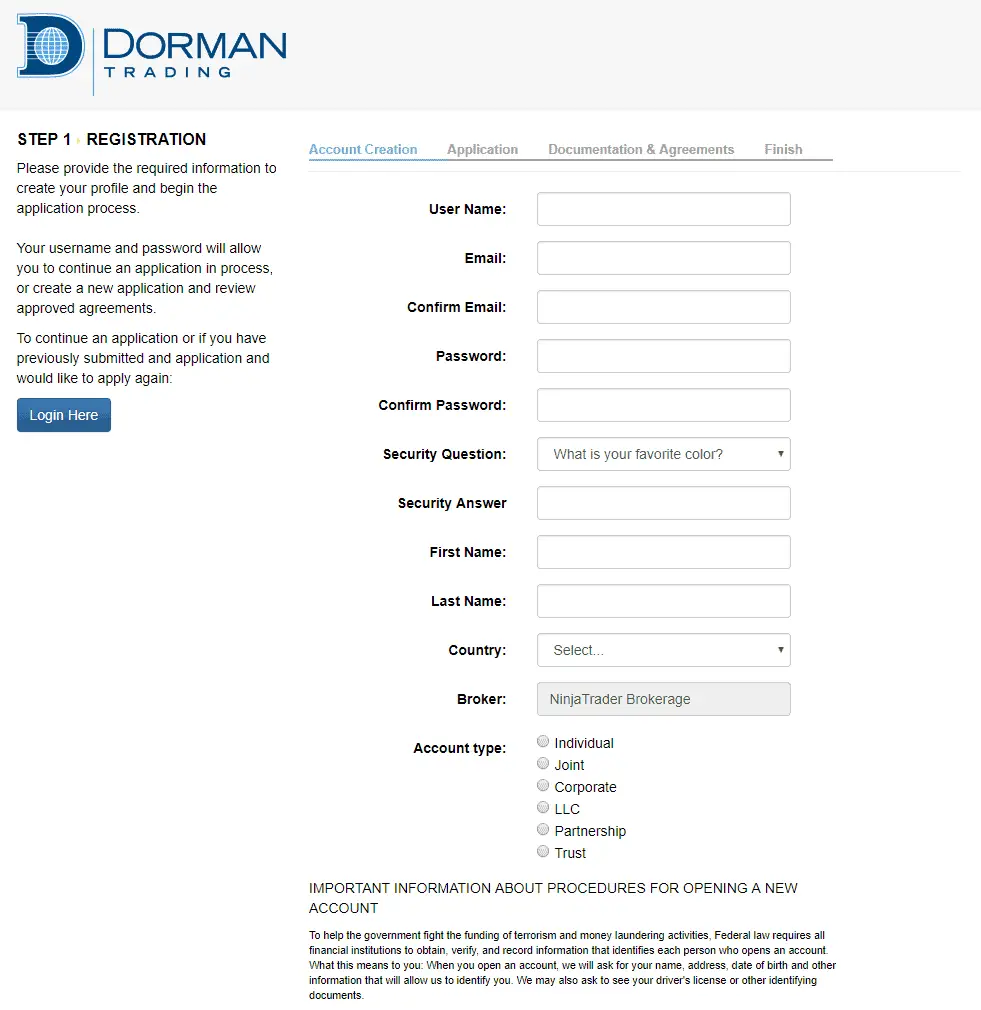
Opening a Brokerage Account
The following is a step by step guide of how to open a NinjaTrader brokerage account:
- At the NinjaTrader home page click ‘Brokerage’ in the top menu. Select Futures or Forex (The following example will illustrate opening a futures trading account. For Forex follow the same steps by choose Forex where applicable)
- At the Futures (or Forex) page select ‘Open Account’.
- At the ‘Open Your Account’ select the account you want to open from the drop down menu.
- Select the brokerage firm of your choice. For futures the 2 options available are ‘PhillipCapital’ and ‘Dorman Trading’.
- Complete the ‘application’ details for either brokerage. Including any documentation such as government issued ID and residential address verification.
- Once you have submitted your application you should receive an email confirming your application and that it’s being reviewed.
- Once your account application is approved you will receive a ‘Funding Instructions’ email. This will include your new ‘Account name’ and ‘Account number’. Within this email will be a link to ‘funding instructions’. A minimum of $USD1000 is required to open an account.
- Once the funds have been received by the brokerage you will receive an email containing ‘Live account connection instructions‘.
- This will contain a link to ‘Activate Live Market Data’. Click the link and follow the steps:
- Step 1. – Declare your trading status – For most day traders this will be ‘Non Professional’.
- Step 2. – Acknowledge Market Data Subscription Agreement – Read and Acknowledge agreement at bottom of window.
- Step 3. – Select Market Data – This is where you will choose the exchange to receive market data and will depend on the ‘instrument/s’ you intend trading. For the ES and NQ this will be the CME. If you intend trading other instruments such as CL. You will require the NYMEX also or you can select the CME bundle for all CME exchanges.
- ‘Set Up Your Live Account Connection’. Your username is included in this section. The rest of your ‘account credentials’ with be emailed to you in a separate email. To connect to your new brokerage account in NinjaTrader follow the instruction listed in the ‘How to connect to Ninja Trader data feed’ section above. Enter your ‘username’ and ‘password’ (account credentials) in the fields when requested.
- Add license key.
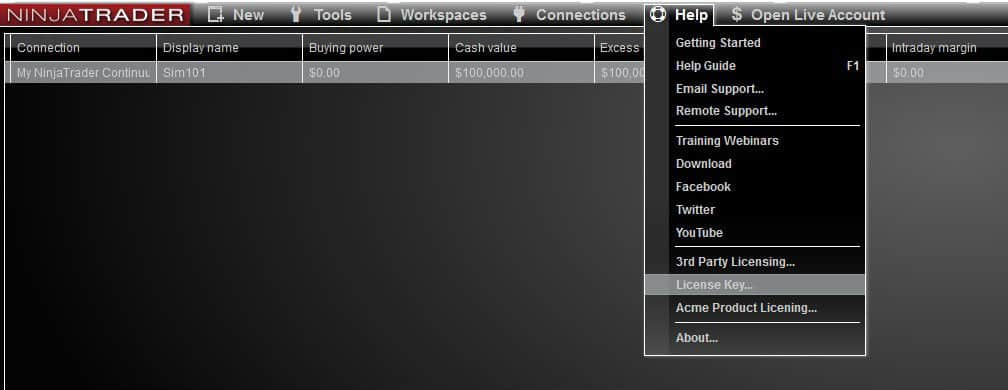
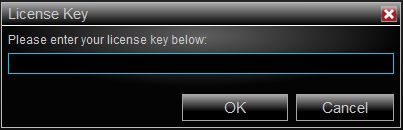
How to change NinjaTrader License key?
For live trading you need to add the new license key emailed to you after purchase. To do this go to:
‘Control Center’–>Help–>License Key and add your new license key.
Once you have completed these steps you’re now ready to trade live!