One of the biggest challenges for any trader is continuously monitoring market data and information. Today, the better charting software provide alerts notifications for specific events. In this post I will provide a complete guide to setting and configuring Tradingview alerts.
This guide aims to help users navigate, set and configure tradingview alerts. It provides a step by step tutorial on the different alert types including: Tradingview price alerts, Tradingview indicator alerts, Tradingview strategy alerts and Tradingview drawing alerts. This guide will also explain how to setup and manage the alerts.
Tradingview comes integrated with a full suite of trading alert options. To get the most out of the full range of the platform features consider signing up for a free trial below.
Signup for a Essential, Plus+ or Premium TradingView subscription using the link. *New users get $15 towards a new plan.
What are Tradingview Alerts
Tradingview alerts notify users when price meets a user defined criteria.
This can be a price level, indicator area, trend line or directional movement. Tradingview alerts are most useful to traders that have medium to longer term trade horizon and can’t be at their workstations continuously.
All Tradingview alerts are ‘Server-side’. Which means all preset alerts are created and triggered on Tradingview’s servers. Users don’t need to have their computers or Tradingview running for an alert to trigger and receive alert notification.
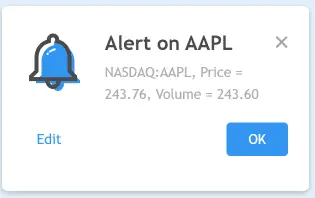
Users can be notified that an alert has been triggered via SMS, email, via the App or popup window in the platform.
Advantages of Tradingview alerts
Tradingview alerts offers two key benefits:
- Time : Alerts allow traders to step away from their desk or complete other tasks. Trading alerts provide immediate notification of events specific to a trading plan.
- Missed opportunities : Any trader watching multiple markets will inevitably miss opportunities. Alerts reduce the risks associated with missed opportunities.
Are Tradingview alerts FREE?
Tradingview alerts are available with ALL Tradingview plans. FREE plan users have limited access to the Tradingview alerts feature.
If you plan to use alerts on a regular basis or rely on alerts for your trading strategy then upgrading to a paid plan is a must!
Signup for a Essential, Plus+ or Premium TradingView subscription using the link. *New users get $15 towards a new plan.
How many alerts do you get with the FREE Tradingview plan?
Free plan uses to access ONE active server side alert with a maximum duration (expiry) of 2 months.
If you want more alerts active at one time or you want alarms to stay active for a longer duration you’ll need to upgrade to either the ESSENTIAL, PLUS or PREMIUM plan.
How to get access to multiple Tradingview Alerts?
ALL Tradingview plans have access to the alerts function.
Free plan uses have access to a single active alert with a maximum duration (expiry) of 2 months.
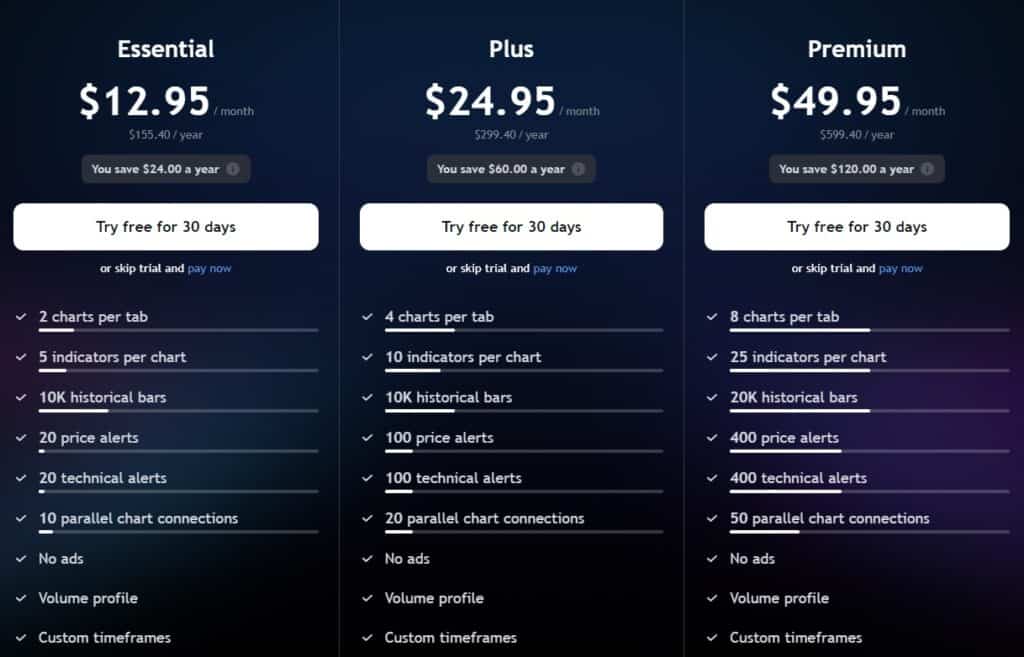
For access to the ‘multiple alerts‘ feature. You must have either a Essential, Plus or Premium account. See the info graphic below for the alarm features available with each plan.
Does Tradingview send alerts?
YES, All tradingview plans allow users to receive alert notification via SMS, email and via the Tradingview App.
For more information about the types of alert notifications available plus how to setup a notification see the Alert Notifications section below.
TradingView Alert Types
- Real-Time Price Alerts – This is the most commonly used trading alert. Real-time price alerts are used on price levels of interest. Enabling an alert on a particular price level will notify the user once price reaches a specific level.
- Indicator Alerts – Indicator alerts allow users to set of PREDEFINED indicator conditions to trigger an alert notification. For example a Crossing up, Crossing down, Greater than and Less than conditions can be applied to almost all indicators.
- Strategy Alerts – Strategy alerts, notify users once an order is successfully executed by the strategy selected by the user.
- Draw Your Own Alerts – Tradingview also offers alerts for the lines drawn using the line drawing tool. You can set alerts on drawing objects such as: trendlines, horizontal lines and rays, etc.
Creating TradingView Alerts
Where can I find the Alert feature in TradingView?
There are multiple ways of creating Alerts within Tradingview. Below is a summary of the main methods for finding the alerts feature.
- Top Toolbar Alert Icon Button – The simplest way to find the Alerts feature is using the alarm clock icon on the main toolbar at the top of any chart.
- Shortcut (Alt + A) – Access “Create Alert” by doing the keyboard shortcut Alt + A.
- Right Click – To set an alarm at a specific level right click anywhere on the chart. In the pop up window there is the option to ‘Add alert…’
- Side bar alerts manager – In the right sidebar of any chart is the Manage Alerts icon. Here you can set and manage alerts.
- Plus Button Price Axis (Y-Axis) – You can automatically assigning an alert to the price level of interest by clicking the black plus (+) sign beside prices on the Y-axis. This will not open “Create Alert.”
TradingView Alert Settings
The Tradingview Creat Alert settings window is similar across the entire platform. Settings are categorized into 5 main sections: Condition, Options, Expiration Time, Alert Actions, and Message.
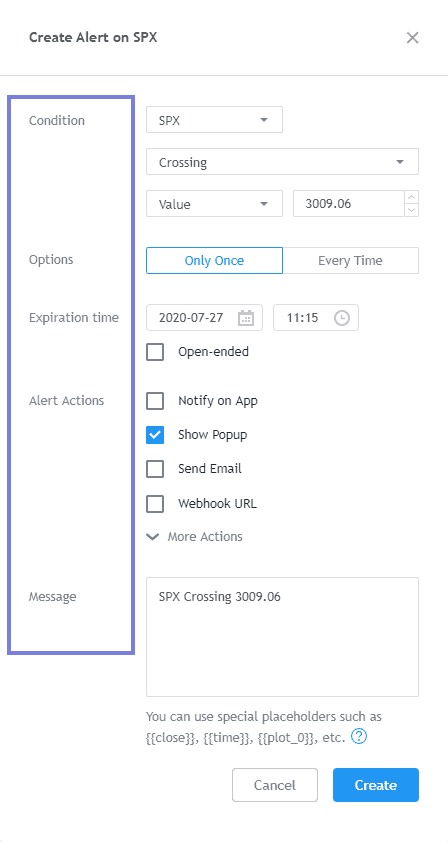
- Condition – Serves as the alert trigger. A condition is used to qualify whether a specific price action meets a specific criteria. In the condition section select the instrument, Alert Condition Type and Price levels.
- Trigger – Users can choose the recurrence of a particular alert.
- Expiration Time – Set the lifespan of your alert. Note: Beginning from date of creation, TradingView’s default alert validities for non-premium accounts is limited to 2 months. If you need for time upgrade to a premium account.
- Notifications – TradingView offers a selection of alert notification actions to select from. From app notifications, email, to webhooks. Users can select one or choose multiple notification options.
- Message – Create a custom alert notification message
- Variable Values – Variable values substantiate the message prompt by adding other details that may be relevant to the user. There is minor coding required to successfully do this. For more information, click here.

Tradingview Alert Notifications
Tradingviews alert notifications is a brilliant feature. It’s certainly worth taking some time to understand all that this feature has to offer to get the most out of it.
The image below is the expanded version of the Alert Notifications settings window. Tick the checkbox beside the alert action of your choice.
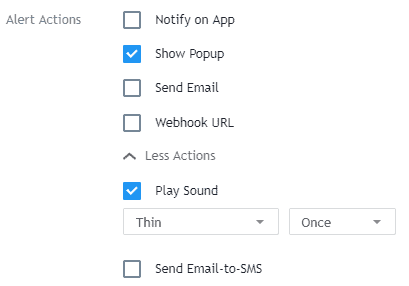
TradingView Alert Notification Types
- Send Email: Alerts are sent via email to the email address registered with your TradingView account
- Webhook URL: A post request is sent to the URL tagged once an alert is triggered. Note: this feature is only accessible for upgraded TradingView plans
- Notify on App: Clicking this option will open a prompt requiring a TradingView app installed on your device and enabled push notification permissions
- Show Popup: This option pushes notifications to your web browser if notifications are enabled and allowed. Note: As a browser popup, you will still be notified even when you are browsing on a different tab.
- Play Sound : Sound notifications accompany your text type notifications. Ticking the “Play Sound” checkbox will open two options: sound type and duration options.
- Send Email to SMS : Receive notifications directly to your phone via text message. TradingView uses a range of international email providers to enable this feature to work smoothly. The list is updated frequently. You can check the list here
TradingView Alert Conditions
We will go in great depth in discussing alert conditions. After reading this section, you will have an excellent understanding of the different value adds and unique importance of each of these conditions; and hopefully see how its distinct roles will fit in your trading system.
- Cross up – Condition is triggered when price moves in an upward direction and crosses up a specific level of interest for the trader.
- Cross down – The reverse of cross up. Condition is triggered when price moves in a downward direction crossing down.
- Crossing – The main difference of crossing from the prior two is that a condition is met when a price crosses a level of interest regardless of the direction (up or down).
- Greater than – Condition is triggered when price surpasses and convincingly breaks above a level of interest
- Less than – Acts as the reverse of “greater than.” Traders are notified when price convincingly breaks below a level of interest.
- Entering Channel – Condition is satisfied when price triggers and enters a channel. Similar to crossing, the way the price enters does not matter, whether it enters through breaking the upper bound (through a downward move) or the lower bound (through an upward move)
- Exiting Channel – Works in reverse of entering the channel. Condition is satisfied when price exits the set channel whether to the upside or to the downside.
- Inside Channel – Notifies the user when price is trading within the defined channel.
- Outside Channel – Notifies the user when the price is trading outside the defined channel.
- Moving up ($) – Alert is triggered when price moves up beyond the number of ticks per bar set in the criteria.
- Moving down ($) – Like Moving up except the alert is triggered when price moves down
- Moving up (%) – Similar to moving up($), but using percentage as basis rather than ticks.
- Moving down (%) – Similar to moving down ($) but using percentage as basis.
Creating and Configuring Price, Indicators, Drawing and Strategy TradingView Alerts
This section will describe how to create and edit price, indicators, drawing objects and Strategy alerts.
Creating a tradingview Price alert
- Step 1: Open the “Create Alert” window – This window is accessible via selecting the alarm clock icon on the main toolbar and alert manager, Y-axis plus button, right click or shortcut Alt+A. Refer to subsection “Where can I find the Alert Feature?” under Section “Creating Alerts” for more detail on each of these methods.
- Step 2: Select “Price” from the condition dropdown menu.
- Fill the necessary fields in the Create Alert popup window.
- Step 3: Click Create Alert button in the bottom right corner. Your new alert is denoted with a grey dotted horizontal line.
- Your new alarm can be viewed and managed in the “manage alarms” menu – Chart right hand side vertical menu.
Creating a Tradingview Indicator Alert
TradingView offers the ability to assign an alert conditional on an indicator. The following steps outline how to do this:
- Step 1 : Identify technical indicator – Ensure indicator is active on your chart.
- Step 2: Open “Create Alert” Window – Select the alarm clock icon on the main toolbar or using one of the other methods mentioned in the “Where can I find the Alert Feature?” section to open the “Create Alert” window.
- Step 3: Select the indicator from condition drop down menu
- Step 4: Fill in the fields to configure alert – Refer to subsection “Configuring Real-Time Price” alerts above for more details.
- Step 5: Click Create Alert button in the bottom right corner.
- Your new alarm can be viewed and managed in the “manage alarms” menu – Chart right hand side vertical menu.
Creating a Tradingview Drawing Alert
- Step 1 : Identify drawing object – A drawing object must already be drawn on the chart. You can set an alert on any drawing object.
- Step 2 : Open “Create Alert” Window – Select the drawing object to add the alert. In the drawing panel. Click the alarm clock icon to open “Create Alert”.

- Step 3 : Fill the fields – Refer to subsection “Configuring Real-Time Price” alerts above.
- Step 4: Click Create Alert button in the bottom right corner – Your new alert will be denoted with a clock next to the drawing object.
- Your new alarm can be viewed and managed in the “manage alarms” menu – Chart right hand side vertical menu.
- Note: Status of drawing alerts is denoted by the color of the alarm clock. Active : color is the same as the drawing object. Inactive : color will turn gray
Creating a Tradingview Strategy Alert
- Step 1 : Add strategy – Ensure that the strategy is already running on your chart. You can opt to create your own via “Pine Editor” or select an already existing one via “Indicators & Strategies.”
- Step 2 : Open “Create Alert” Window. You can access the “Create Alert” window from the alarm icon located at the top of the Strategy panel at the bottom of your chart.
- Step 3 : Fill the fields
- Step 4: Click Create Alert button in the bottom right corner
Tradingview Alerts Manager – Managing alerts
All alerts, whether active or not, are logged on the Manage Alerts panel – Located in the right vertical chart menu. Denoted with an alarm clock.
Editing Alerts
The simplest method for editing alerts is via the manage alerts panel mentioned above. To edit an alert:
- From the manage alerts panel select the alert to edit.
- Selected the alert icon (Gear) – Right side
- Edit alert
- Click save
Deleting Alerts
The simplest method for deleting alerts is via the manage alerts panel mentioned above. To delete an alert:
- From the manage alerts panel select the alert to delete.
- Selected the ‘alert ‘X’ icon – Right side
- In the popup window – confirm “Yes”
Signup for a Essential, Plus+ or Premium TradingView subscription using the link. *New users get $15 towards a new plan.