In this post I’ll describe how to use Tradingview to journal trades. Whilst Tradingview doesn’t offer an official Tradingview journal feature per se. It’s possible to use the platform features to journal trades and keep a record of your trading history.
In this post I’ve produced a guide for to create a trading journal in tradingview.
Signup for a Essential, Plus+ or Premium TradingView subscription using the link. *New users get $15 towards a new plan.
Can you journal in TradingView?
At the time of writing TradingView doesn’t offer an ‘official’ Tradingview journal feature on the platform. However…
TradingView does offer several platform features that can function as a really effective trade journal. Users can produce text notes, add images, add chart links and even produce video recordings. These can all be retrieved at a later date and even shared with other users in the Tradingview community.
Perhaps this is why TradingView doesn’t feel the need to offer an official journal feature since the platform effectively offers similar features.
Tradingview journal features and benefits
Chart annotation tools: The suite of free drawing tools and various text boxes and callouts for on-chart commentaries makes it easy to annotate charts.
Image snapshots: Users can snapshot of the annotated chart with the screenshot feature. Then add the image link to a journal or post entry. [Users require a minimum number of Tradingview reputation points to save images to post / journal entry].
Produce videos: Users can also use the ‘Produce video idea’ to produce a video recording of a live trade. This can then be saved and/or shared with the tradingview community. [Users require a minimum number of Tradingview reputation points to save images to post / journal entry].
Share ideas or keep private: This can instantly share any post/journal entry with the community by making them ‘public’ or save as private for your own records.
All-in-one solution: Tradingview provides an all in one solution for your analysis, trading, journaling as well as sharing ideas. This is an efficient way to keep visual records of trades while also having the option to gather feedback or critique from a thriving community. All within grasp on the TradingView platform!
In this post, we will explore ways to take advantage of these TradingView features to create your own trading journal all within the platform.
How to Journal trades on TradingView?
In this section, I’ll provide a step-by-step guide on journaling trades using TradingView.
All the features mentioned here are free for every TradingView user.
However if you plan to get the most out of the platform getting an upgraded plan is a good option.
Signup for a Essential, Plus+ or Premium TradingView subscription using the link. *New users get $15 towards a new plan.
To get started creating your own Tradingview Journal. See the steps below:
This is intended as a general guide. Feel free to play around with the features on your own to find which one work best for you.
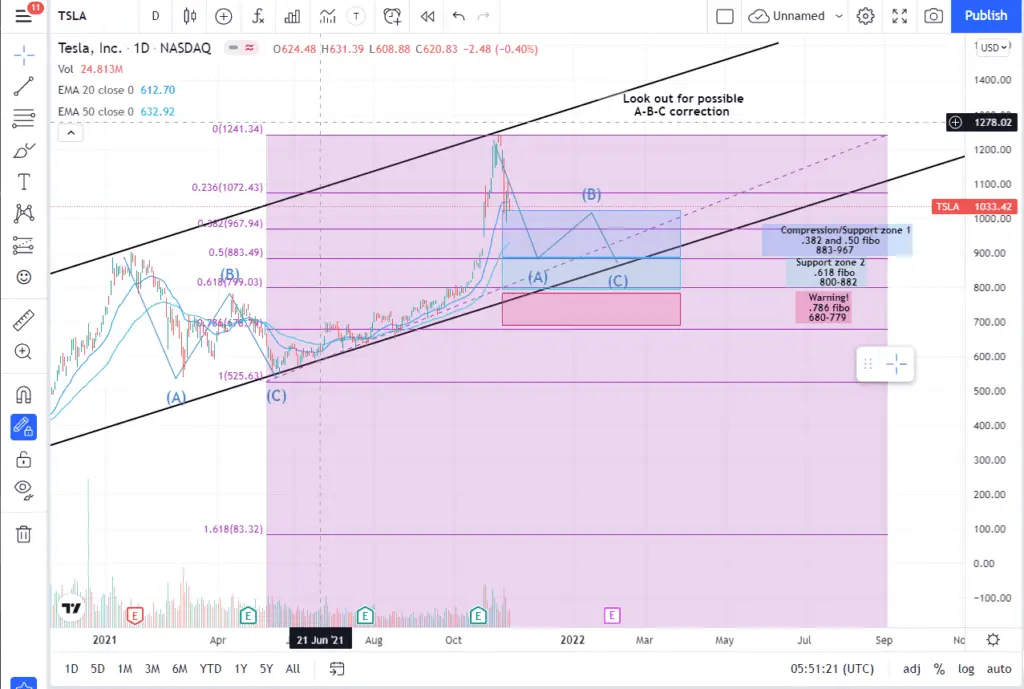
Step 1: Analyze trade/chart
If you like to include an annotated chart to your journal. Tradingview offers brilliant tools and annotation features for creating clean and clearing charting analysis.
This is a great way to provide visually communicate your thoughts and ideas.
Tradingview tools for analysis and annotation include:
- Drawing tools [Tradingview offers 50+ different drawing tools]
- Indicators [Tradingview offers 100+ different indicators]
- Text
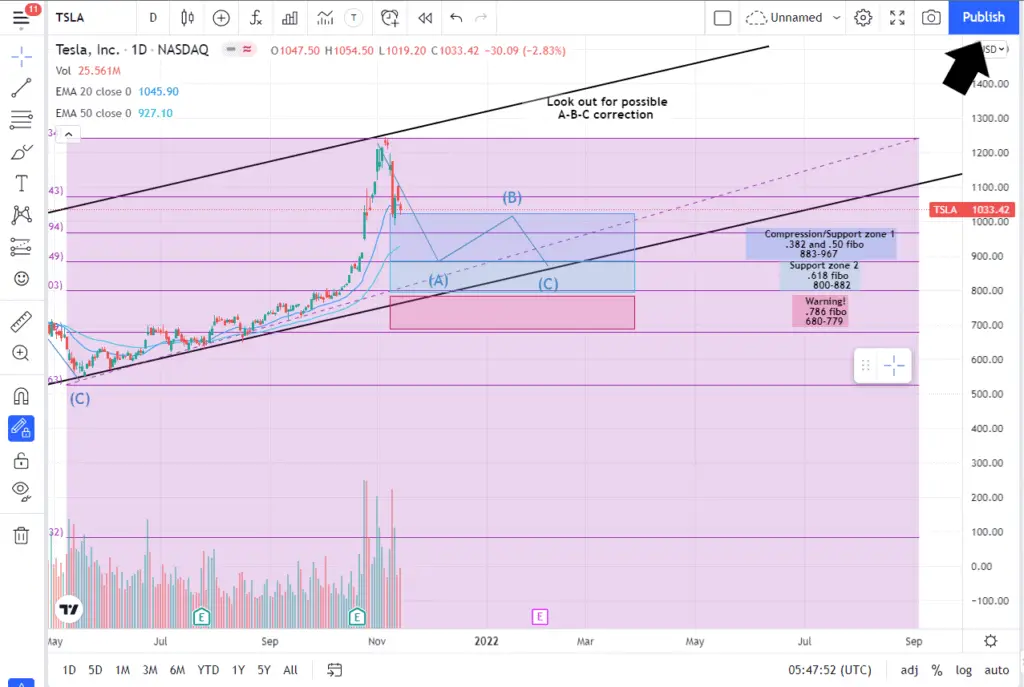
Step 2: Publish idea
To create a Journal entry in TradingView, you want to publish an idea. This can be made private or shared within the Tradingview community.
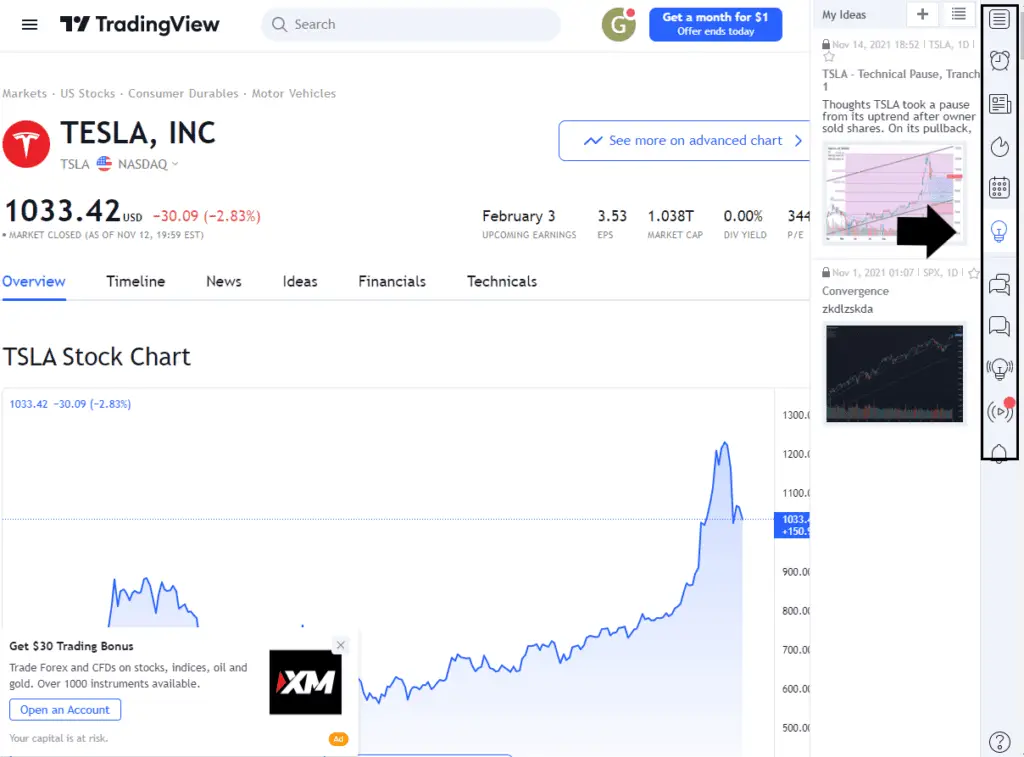
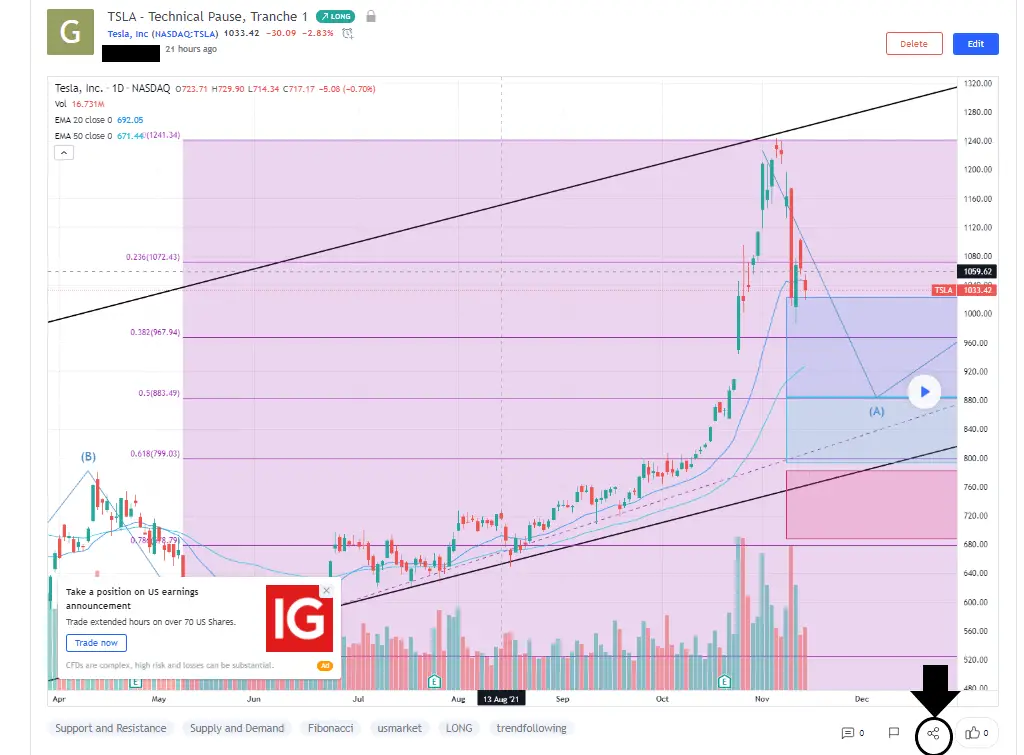
To begin, locate the publish button at the upper right corner of your chart. See arrow below
Click Publish Idea or Record video idea*
Record video idea
Record Video idea creates a screen recording, where all movements and actions on a screen will be recorded and saved as a video. TradingView enables audio during the recording for narration and voice overs.
Video recordings are limited up to a maximum of 20 minutes. Click here to learn more.
Step 3: Writing a journal entry
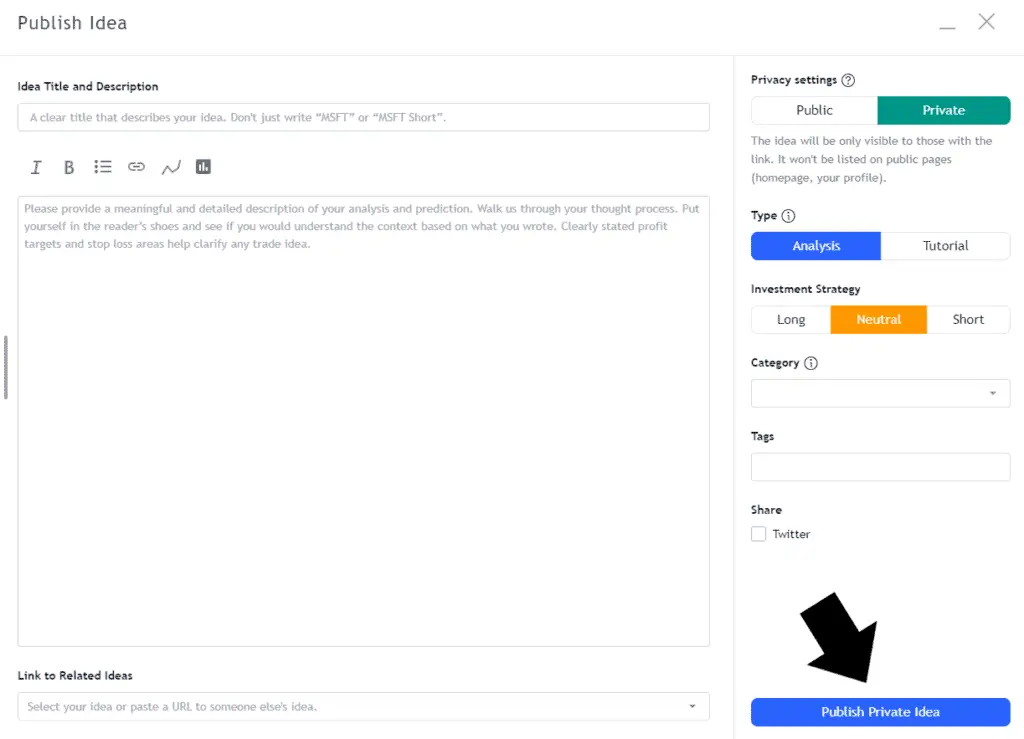
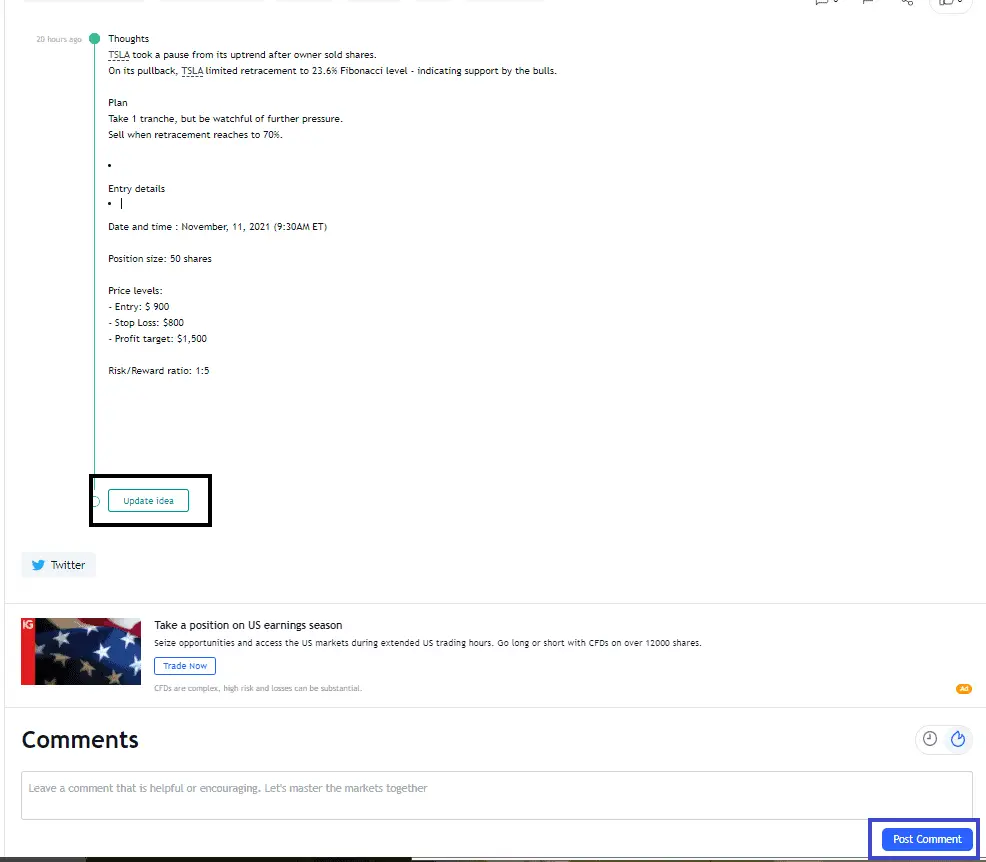
Within the Publish Idea section. Here you can add all the detail you want to include within your Journal entry. You can give your entry a title, add notes and links, make to entry private or public, categorize your entry, add tags even share on twitter.
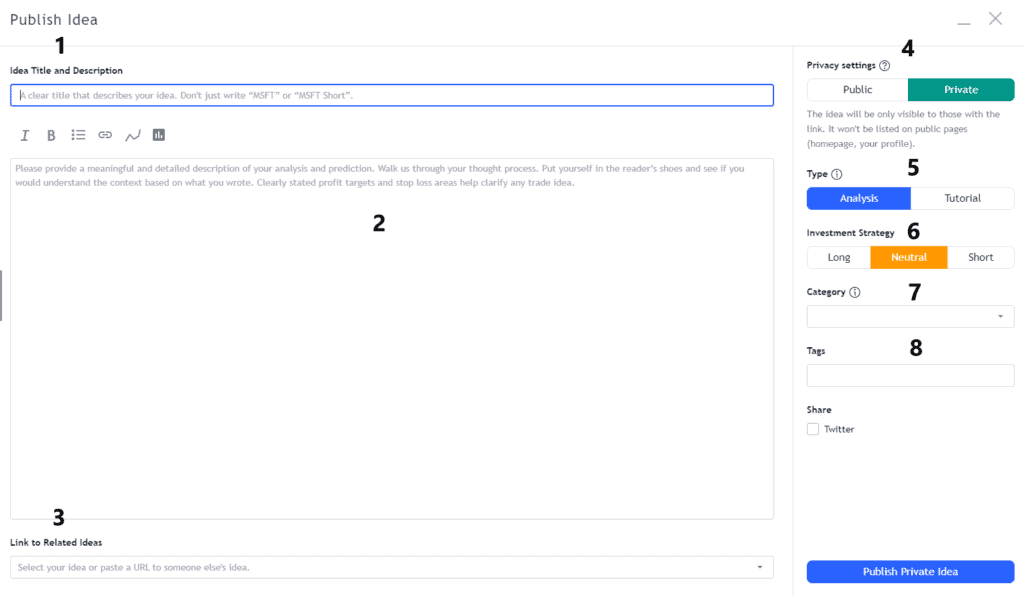
Recommended features to use for writing entries:
Idea title and description See #1 in screenshot above
- Name journal entry and provide the main idea of the analysis
- Tip: include symbol for quick reference
Description box See #2 in screenshot above
Write a detailed analysis using a template to keep entries uniform
Things you might want to include:
- Date and time
- Position size
- Price levels: Entry, Stop Loss, Profit target
- Risk/Reward ratio
- Thoughts: reasons why you took the trade
- Emotion
Linking a published idea See #3 in screenshot above
- Ideally an idea that supports your view to provide more color to your analysis
- Note: This feature requires a minimum number of reputation points. To learn more about reputation point click the link.
Privacy settings See #4 in screenshot above
Public – This option will post your entry in the community – encouraging feedback (both negative and positive) and dialogue.
Once you posted a public idea, TradingView will no longer allow edits after 15 minutes since time of posting.
Private – Publishing a post as private will only make the post appear to anyone who has access to the post link.
Type See #5 in screenshot above
Select Analysis as type, not Educational. This will categorize it as an Analysis post where content is purely about market analysis (Trade setups, patterns, etc.) – fitting for a trade journal entry.
Long/Short/Neutral See #6 in screenshot above
Mark entry based on the trade sentiment
Category See #7 in screenshot above
Select up to 3 categories from the dropdown that will help describe how you approached your analysis. See sample screenshot below.
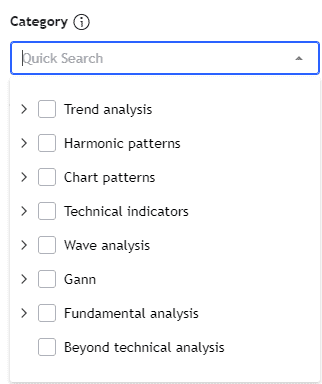
Note: Categories will appear as tags in the post. To learn more about tags, see the next bullet point.
Tags See #8 in screenshot above
Add a label to your journal entry to create buckets of categories for your entries. This will help organize entries/trades that share similar characteristics.
However, do note that tagging a post will categorize it with other public* posts. This is unlike other trade journals that only utilize tags through the internal posts that the user created.
- Tag examples: Trendfollowing, Swing, USMarket, Crypto
- Tip: create unique tags (i.e., trendtrade_unique)
*To clarify, private posts that your posted will NOT appear in the public domain even when you tag it using a public tag.
Step 4: Publish entry
Click Publish Private/Public idea at the bottom right of the page
Step 5: Viewing and updating entries
To view or update your journal entries. Here is a shortcut:
Step 1: Click the light bulb icon on the right panel to view ‘My Ideas’
- Note: Your ideas are arranged from latest to oldest publish date – It acts like a chronological-based trading journal.
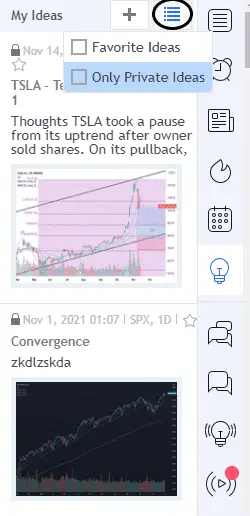
- Tip: You can filter the ideas to show only: Favorite ideas or Private ideas See circle below
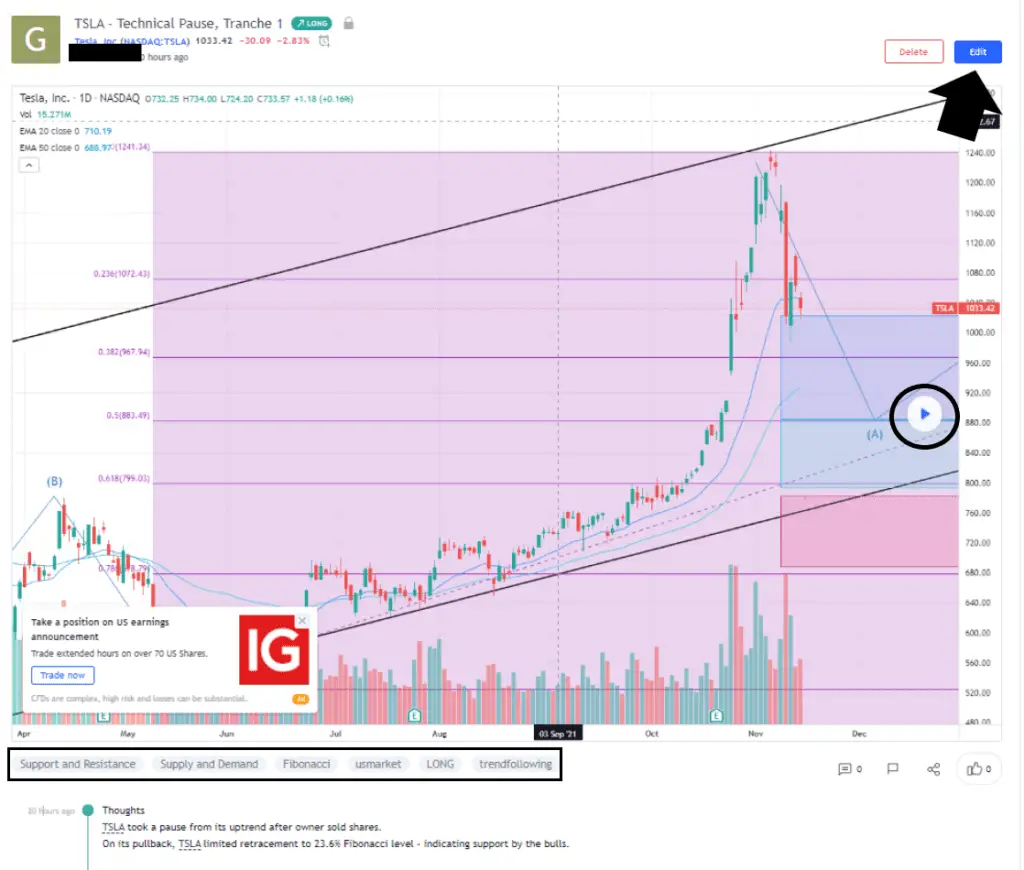
Step 2: Click the “idea” that you would like to view or edit. This will open the “idea.”
Step 3: Filter and View the entry
Clicking the ‘tag’ below the chart (see image below) will filter to posts with that same tag. This is an easy method to sort posts for easy retrieval. Important! Remember give your tags a unique name to you. Otherwise other public community post will filter into your list.
Step 4: Edit entry
Click Edit button on the upper right See black arrow above
This function is used to edit the existing details of your post (it will not assign a new time and date stamp like update entry see below).
The play button to the right of the chart will load the most up to date bars onto your journal entry chart.
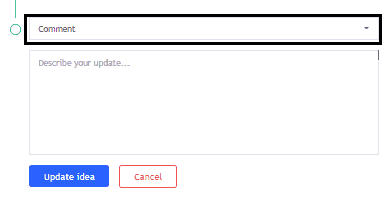
Step 6: Update entry
Update entry is used to add new details or updates to your existing post. Each update is automatically given a new date and time stamp. This is a great way to keep a trade progress style journal entry.
To update an entry;
- Scroll down then click Update Idea below See black box below
- Select the type of comment by selecting from the dropdown
- Close: target reached
- Close: stop reached
- Trading: active
- Trading: cancelled
- Trading: closed manually
‘Update Idea’ is a really nice feature that you should consider utilizing as a part of your trade journal. This feature allows the users to update trade/market developments recorded into a timeline – cleanly showing how the trade progressed or is progressing.
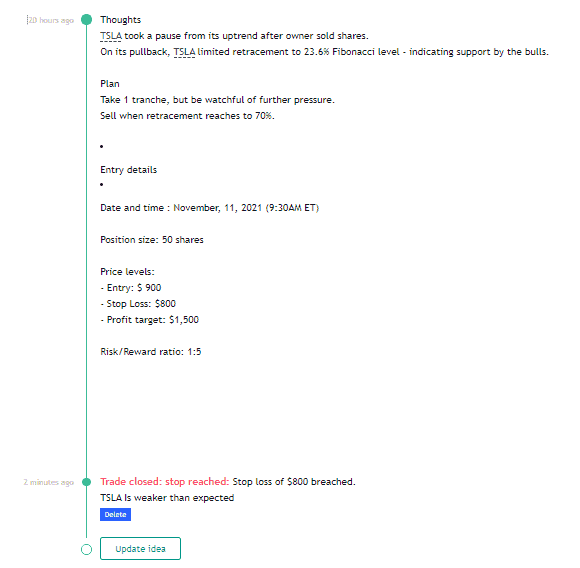
Sample illustration of updated idea with the timeline view .
Sharing post externally
One way to take advantage of the TradingView journal is to link this post to an existing online notebook or a third-party journal or journaling solution (Evernote).
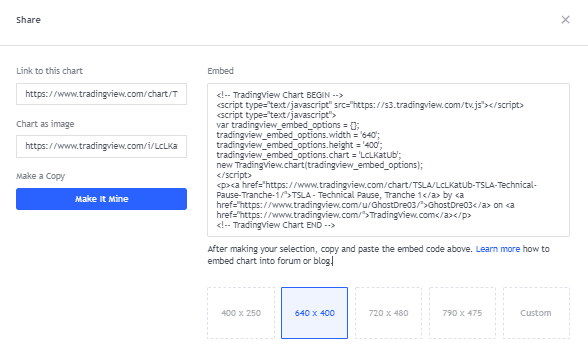
TradingView made this quick and easy by making the URL universal. All you need to do is to click Share on the post See circle and arrow below
Select either:
- Link as chart
- View the actual post/entry
- Link chart as image
- Only view a snapshot of the chart as an image
- Embed
- To copy the chart and embed to your website/blogsite
This is a great way to keep all your journal sources aligned. If you are interested in exploring other journaling solutions, visit my previous post on free trading journals.
Signup for a Essential, Plus+ or Premium TradingView subscription using the link. *New users get $15 towards a new plan.